It happens that the usual interior is so tired that you want some changes, but there is no desire to start a big repair. The best way to change the design is to change the decoration of the windows. Or another such design technique - installing ceiling curtains in a place where there is no window. A simple change of curtains will help diversify or change the style, depending on the chosen material, will add lightness or solidity, sophistication to your home. Our article is for lovers of change. Read and hold on.
Criteria for choosing ceiling curtains
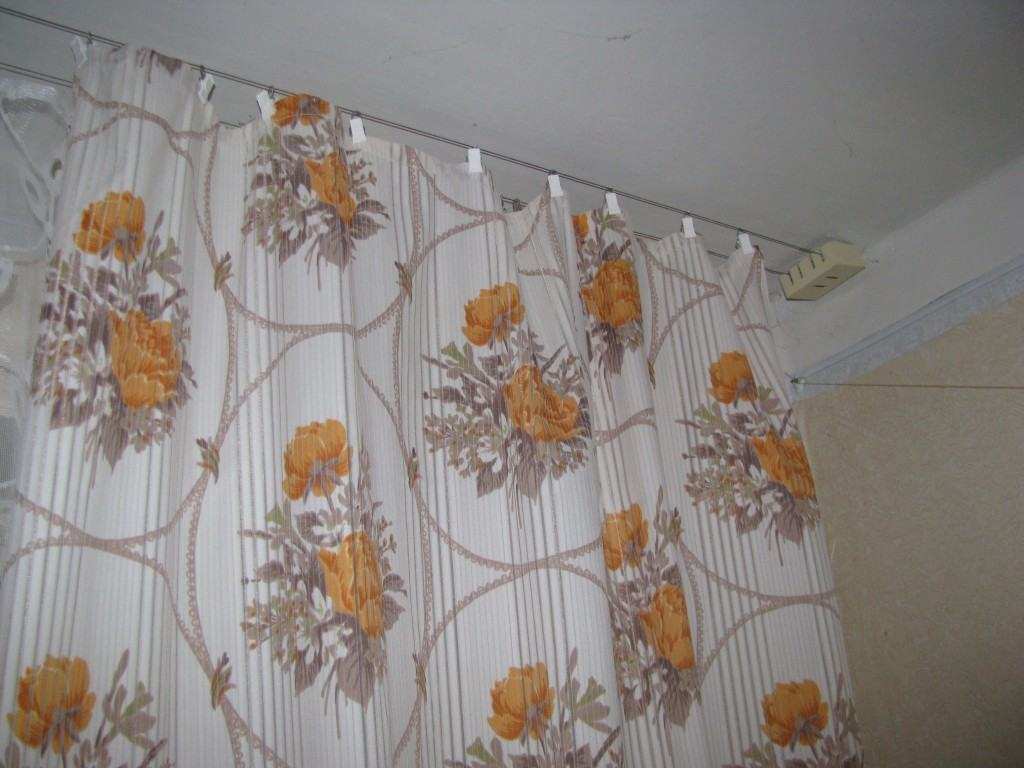
Ceiling curtains are a very good option for rooms with a low height, because. visually increase their volume, make them more spacious and taller. Often they themselves become a stylish part of the interior of the room. The main thing when choosing cornices is the correct selection of their load capacity. Some are able to withstand only light fabrics, while others can hold heavy materials, so the weight of the curtains is the main guideline here.
Materials for ceiling cornices
For the manufacture of fasteners for curtains, different materials are used:
- Plastic. From it, cornices of various shapes and colors are obtained, easily fitting into any design. They are practical and inexpensive. Models are both simple and very luxurious, decorated with a baguette bar.
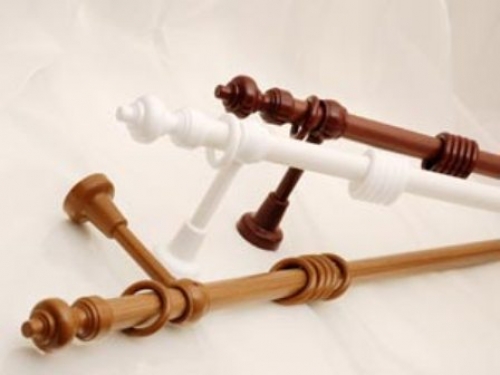
2. Tree. Curtains made of wood usually have a round section. Suitable for rooms decorated in a classic style. These products are eco-friendly, sometimes decorated with carvings, but sometimes they are emphatically strict, very simple.

3. Metal. A metal cornice is able to hold heavy curtains. It is equally appropriate in rooms designed in vintage styles "Provence", "Retro" and modern - "Modern", "Hi-tech".
Types of curtains depending on the application
You should know that curtains are:
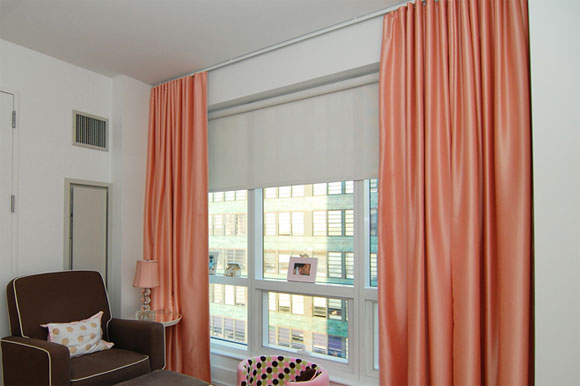
- single-row - only one curtain is hung, most often tulle;
- double-row - it is possible, in addition to tulle, to place also night curtains;
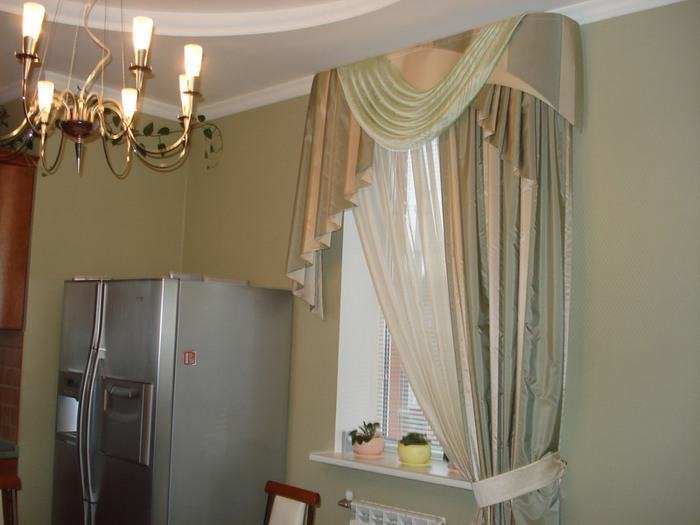
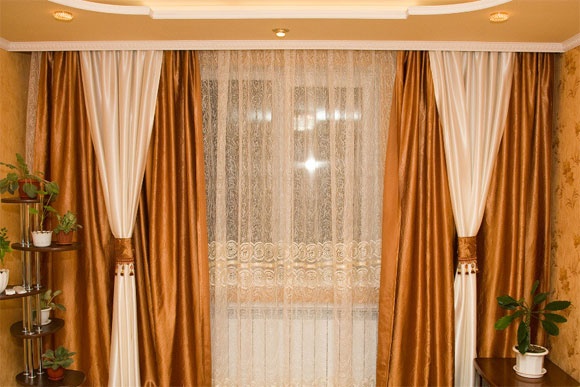
- three-row - tulle and curtains are complemented by lambrequins;
- four-row - are chosen when it is planned to perform some kind of complex drapery.
Choice of curtain length
When the cornice is designed to be installed above the window, then to calculate its length, simply measure the width of the window and add 0.4 m to this parameter. If there are 2 narrow windows side by side on the wall, then 2 options are possible - one long curtain that combines both opening or two above each window, then the length of the cornice will be equal to the width of the opening plus 0.2-0.3 m. With this approach, with the curtains pulled apart, the window will be completely open.
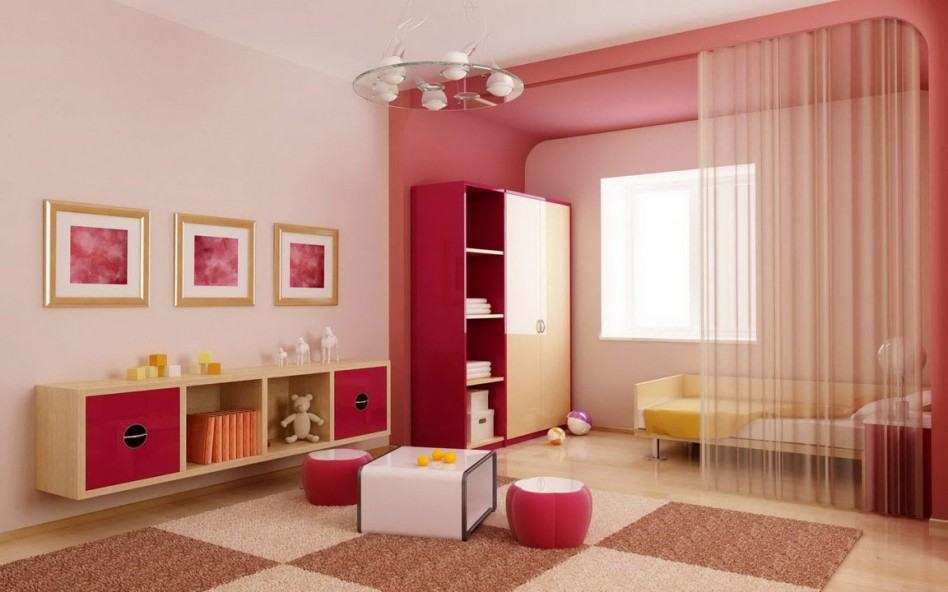
When using curtains to separate some part of the room, measure the width of the room and choose a curtain slightly shorter than this figure.
Photo and video instructions for installing and attaching curtains to different surfaces
Curtains made of metal and wood have ready-made mounting holes, so let's look at how to attach a plastic curtain to ceilings made of different materials. The easiest way is to install on a reinforced concrete plastered ceiling. Let's start with this option.
Installation of curtains on the ceiling of reinforced concrete slabs
Would need:
- roulette;
- perforator;
- drill;
- drills with victorious tips;
- screws with plastic dowels.
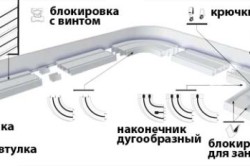
5. A dowel is placed at the point located in the center of the eaves, then it is combined with a hole located in the middle of the ceiling and the screw is driven in until it stops.
6. Place the curtain parallel to the window. Fix it on the ceiling, starting from the extreme points and moving towards the center.
7. Having completed the fixing work, insert the curtain hooks into the grooves.
You can install ceiling curtains on a reinforced concrete ceiling with your own hands in one more way: using liquid nails:
- clean the base, removing whitewash and paint;
- primed, level the plane;
- apply glue to the eaves and press it to the prepared ceiling surface.
Liquid nails will grab after 20 minutes, and after 3 days you can hang curtains. This video will serve as an excellent guide when installing a ceiling curtain on a ceiling with your own hands:
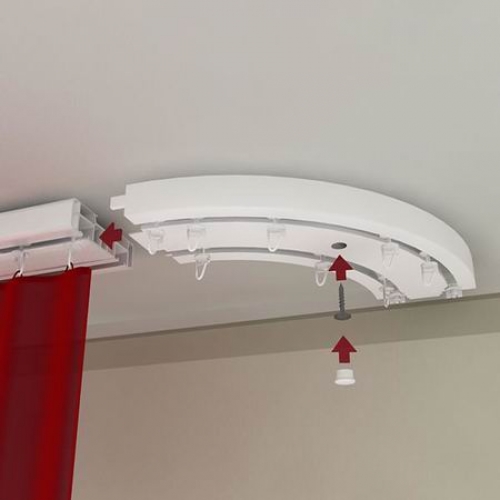
Mounting curtains on a plasterboard ceiling
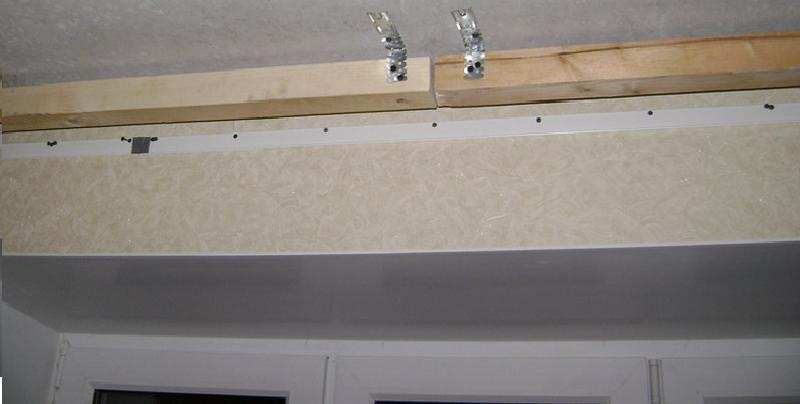
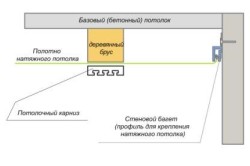
Proper fastening of the curtains on a plasterboard ceiling provides for the presence of a wooden plank or a piece of metal profile pre-fixed under it in the right place. To such a finished frame, the eaves are attached with self-tapping screws.
If during the installation of the false ceiling it was not taken into account that a curtain would have to be attached to it, then you can
use long anchors, but this option is only suitable when the distance between the main and false ceiling is small. Holes are drilled through the drywall, and then the anchor is screwed in with a screwdriver.
When the wiring diagram plasterboard ceiling unknown, then the curtain is mounted using special fasteners. At the same time, they are often placed - at a distance of at least 250 mm, to compensate for the fragility of the support. The mounts have one feature - they are well held due to wedging, but then the load capacity of such a ceiling curtain is limited to 5 kg.

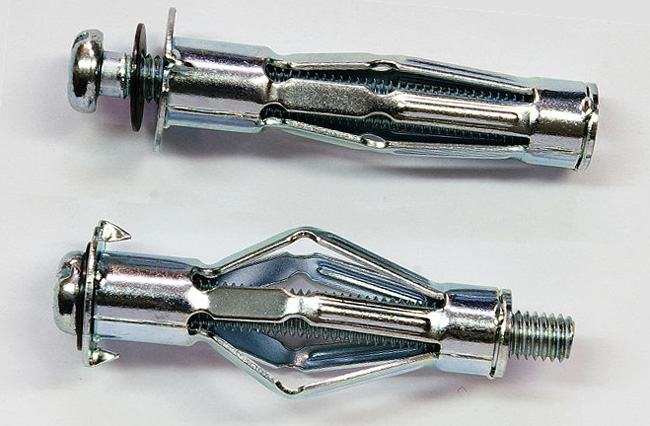
Umbrella fasteners are also used to fasten ceiling curtains.
The secret of how to fix ceiling curtains lies primarily in the fact that this is a relatively new way of designing a room, directly related to the construction of low-ceiling houses and the use of modern repair and construction technologies. The choice of mounting method in any case depends on the material of manufacture of the ceiling, which dictates both the installation technique and the fasteners.
In the conventional sense of the word, these are transparent or translucent curtains used to decorate a window opening. They can be an independent element or an additional daytime background for blackout curtains, or a way of color and space solutions for the interior of a living space, a visual increase in a room or ceiling height, creating volume and color richness of the overall decor.
In a narrower sense, this is the name of the ceiling cornice, on which curtains, curtains and curtains are hung. It differs from the usual one in some design modifications that are directly related to the place to which they are attached. An ordinary cornice is hung above the window on the wall, the ceiling cornice is attached to the ceiling and can serve not only as a means of decoration and closing the window opening, but also as a way of dividing a large room into several zones. The fastening chosen for placing the cornice on the ceiling depends on the material, type and method of manufacturing the ceiling, as well as on its functional features and what kind of curtains will be.
Ceiling cornices
Devices for fastening curtains to the ceiling are made of several profile materials:
- polyurethane (light synthetic material);
- aluminum;
- metal;
- tree;
- profile;
- baguette.
A wide range of manufactured ceiling cornices allows you to attach them to any type of ceiling, taking into account the functional features of the room, the overall decorative solution, and even the financial capabilities of a particular person.
Varieties of designs
Polyurethane lightweight and flexible structures can become not just a means of hanging curtains, but also a decorative element of the interior. With their help, you can decorate complex architectural elements in the form of arches, bay windows, stepped room cornices and polygonal rooms with niches. They can be repainted, modified and thus carry out bold design decisions.
Metal usually have a rounded shape, and they are made in the form of a bar, able to withstand any kind of curtains, exceptionally strong and durable and in harmony with certain interior styles - baroque, empire or hi-tech.
Aluminum have proven themselves for many years of use, lightness and relative cheapness, as well as a wide variability in manufacturing forms. When coated with a special varnish, they can serve even in high humidity, and the common practice of painting with special enamel in various colors gives them the appearance of an additional decoration in the interior.
Wooden cornices of the road. But they are highly aesthetic due to the individual wood pattern and the well-established practice of carving the material. This allows you to make the fixed ceiling cornice and part of the wall a unique interior masterpiece.
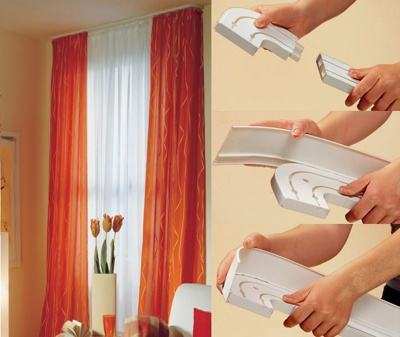
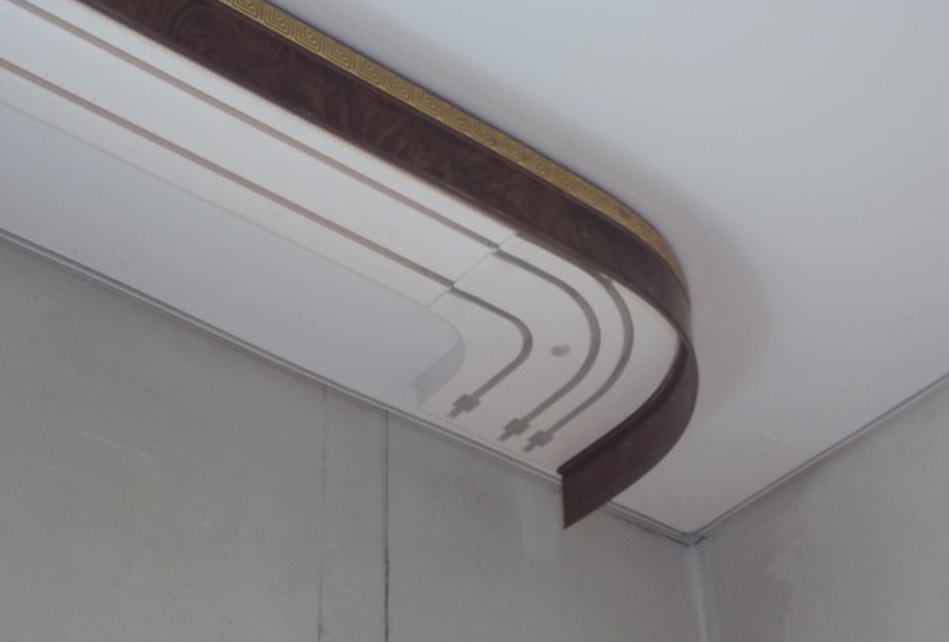
Profiles are made of aluminum or plastic profile, inside which there are special rollers with hooks for attaching curtains. This is the most profitable, frequently used and convenient type of ceiling curtains. Thanks to the elements of different curvature and inclination, they represent a variable way of design.
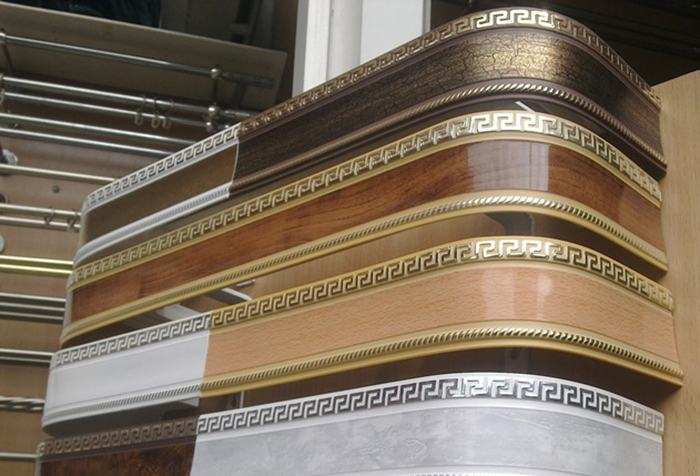
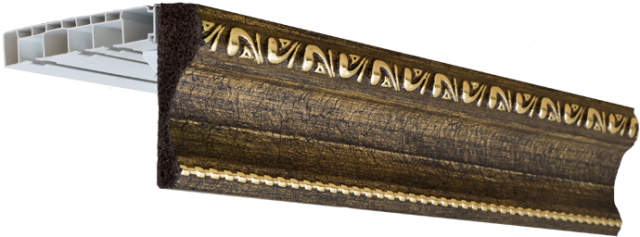
Baguette - a kind of profile option. It has a plank, which is usually decorated with rich imagination. Various materials are used to decorate it - from metal forging to wooden carvings.
The ceiling is that part of the ceiling that is above the head. Depending on the method of registration of the ceiling space, there are several types of it:
- reinforced concrete;
- tension;
- rack;
- drywall;
- mirror;
- hemmed;
- raster or cassette;
- adhesive.
Reinforced concrete - standard plastered ceilings, typical for multi-storey buildings made of panels, or panels and bricks. Stretch ones are made from a cloth or vinyl film fixed on a profile under the main ceiling. The rack ceiling is made of a metal or aluminum plate fixed to the rails.
As well as cassette and drywall, it is made from separate modules fastened together. The only difference is in the materials used. Raster, or, is mounted from standard small square-shaped parts fastened together. False ceilings are installed on a frame, wooden or metal, fixed to the main ceiling. The adhesive boards of expanded polystyrene are fixed directly to the main ceiling.
When choosing a ceiling cornice, it is necessary to take into account the type of ceiling. It is not difficult to attach a cornice to the main ceiling, and it will withstand any weight. In the presence of a stretch, plasterboard, cassette or suspended ceiling, one should be guided not only by the place where the cornice is attached (the manufacturer must provide for the location of the curtain for mounting the cornice), but also the type of material, the property of anti-deformation or deformation, the likelihood of such when using heavy structures. ![]()
Types of fasteners
For fastening to the reinforced concrete ceiling, dowels and screws are used. A hole is made in the ceiling with a perforator, a dowel is inserted into it, into which a screw is screwed. This system will withstand any type of cornice, even cast iron, which is rarely used due to its severity. On a ceiling made of GKL or PVC, a profile strip is attached with suspensions to the ceiling, and they are attached to the wall in horizontal segments. With a small distance between the base and main ceilings, anchors are used, the holes for which are drilled directly through the drywall.
If the false ceiling is properly planned, then the installation is carried out in the ceiling niche in which the profile is attached. The cornice is attached in the usual way to the profile, and then the ceiling is stretched. As a place to strengthen the cornice, depending on the design of the stretch ceiling, a wooden beam or several plywood blocks can be used.
To attach curtains to the ceiling, it is enough to have a puncher, a screwdriver, dowels or plugs, a hammer and screws directly on hand. If they are screwed into drywall, then it is desirable that the head of the screw covers the hole made. Each curtain suspension system has attachment points (for example, an eyelet), into which a screw is screwed during attachment.
How to hang curtains
If you plan to hang both curtains and curtains, it is better to purchase a type of cornice with several suspension lines. The curtains themselves can be attached to the eaves using ties, sewn loops, eyelets, backstage, hook rings, braid, special Velcro tape or rollers with hooks.
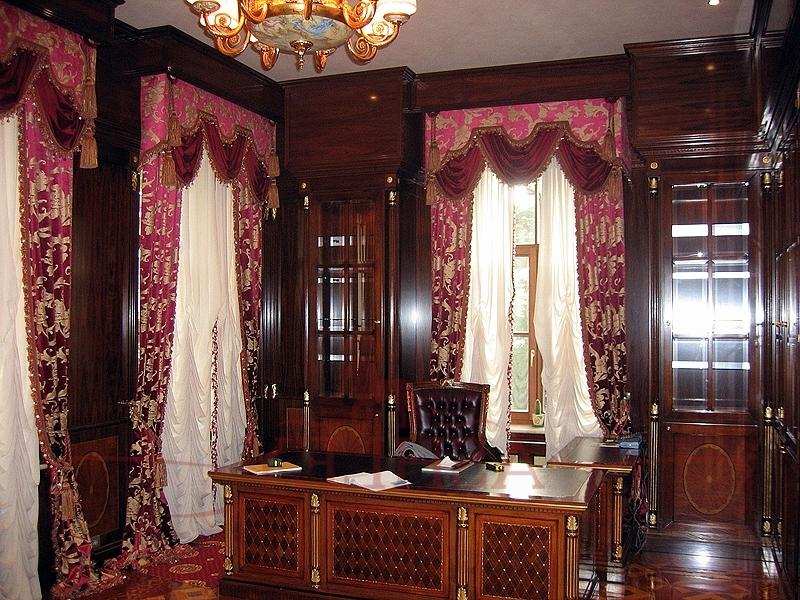
With the help of curtains, curtains and complex hanging structures (pelmets, draperies, frills, loops or rings sewn into the fabric), you can not only visually enlarge the space, divide the room into zones or hide planning flaws, but also give the atmosphere a rich and fashionable look, complement the style design or keep it in a certain key.
Straight curtains made of plastic do not have a large selection in terms of color. However, their relative cheapness and the simple installation of curtains on the ceiling with their own hands make this particular type of ceiling cornice very popular.
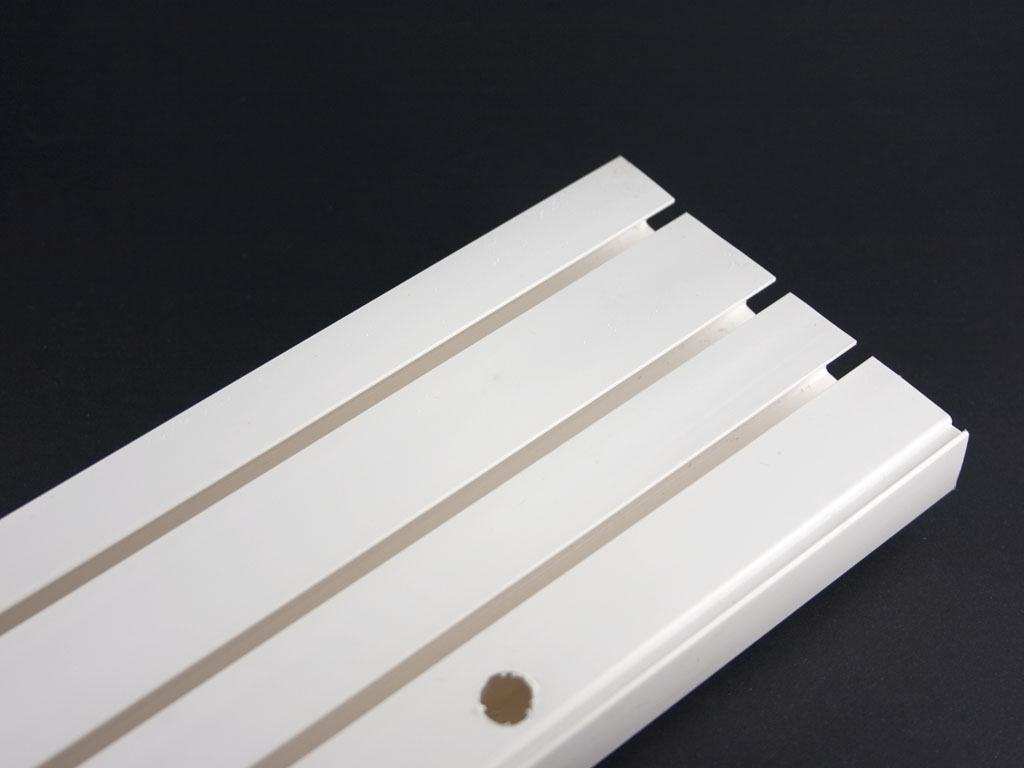
What is a plastic curtain?
Plastic curtains are characterized by standard lengths. Although this parameter is not so significant, since any length can be obtained by increasing an additional piece of a similar curtain, and the excess can be cut off.
Since the direct-type plastic curtain is light in weight, its installation is possible in specially designated niches of a suspended and stretched ceiling type.
In a set with curtains, fasteners and structural components are supplied. Some kits provide a ready-made track solution with a pre-existing hole for attaching to the ceiling surface. But there are also products of this kind in which holes must be made independently. Consider how the curtains are installed on their own according to the second scenario (without a hole for mounting).
Back to index
How to install a curtain: installation instructions
The set of tools you will need to install the curtain:
- screwdriver or screwdriver;
- a drill with a fight or a puncher;
- a hacksaw for metal (saw with fine teeth) or a grinder;
- tape measure, corner, pencil;
- stationery knife.
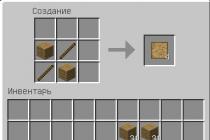
- First of all, the packaging wrapper is removed and the conformity of all the declared elements with their actual presence in the set is checked. If some part is missing, then its presence should be replenished as soon as possible (either buy in addition or ask the seller in the store).
- Cut to appropriate length. Then a plastic guide is placed on the windowsill in such a direction that it is convenient to cut. With a pencil, a straight line is drawn along the superimposed square, which will indicate the place of the future cut. The excess part is cut off with a hacksaw or a grinder with a disk. In a situation where the curtain has two parts and the installation of the curtain involves the use of a connector, the curtain is cut from both sides. In this case, the length marking is carried out from the center (connector, middle part of the window opening) using a tape measure.
- A hole is marked on the plastic guide for attaching to the ceiling surface. Holes along the edges are located no more than 10 cm from the end cut. The rest are marked in increments of no more than 50 cm. Using two drills with different diameters, which are clamped in a screwdriver or drill, marked holes are made for attaching curtains to the ceiling surface. A wide hole is drilled on the front side of the eaves for the caps of self-tapping screws to pass through. After that, the drill is changed to a drill of a smaller diameter and the clearance is drilled to the end. The hole made from the inside will act as a clamp for the cap part of the self-tapping screw. The curtain is raised to the ceiling. Apply to the surface of the ceiling in the position in which it will eventually be fixed. With the participation of a pencil inserted into the hole, a mark is left for the drill or the drill to win.
- The perforator is supplied with a drill of the required diameter. The diameter of the last or victorious drill of a drill with a fight must correspond to the diameter of the plastic dowel-nail plugs. If plastic plugs are not supplied with plugs for self-tapping caps, then they are purchased separately and in advance.
Using a perforator, make a hole in the ceiling. If there is no desire to see how concrete dust scatters throughout the space during drilling, you can substitute a tube from a working vacuum cleaner. For such manipulation, you will need a partner who will hold the vacuum cleaner tube. In the absence of such, it is possible to install the curtain with one hand, and with the other hand, you can bring the vacuum cleaner tube.
AT ceiling holes plastic plugs are inserted separately from the screws. After that, the installation of the curtain occurs as follows: it is again lifted up and, with the help of a clamped bit in a screwdriver, the self-tapping screws are twisted.
At this step, the installation of the curtain (basic installation steps) is considered complete.
Aesthetically unattractive visible holes in the plastic are masked with self-adhesive furniture plugs. They are selected by color. This problem does not arise if the plugs are included with plastic plugs.
And in conclusion, I would like to tell you how to properly hang the curtains to the eaves. Indeed, many complicate their task by first hanging hooks on the curtain, and only then they cling curtains to them. Such an approach is wrong and even difficult.
It is much easier to do the opposite: hook the hooks on the eyelets on the curtains and then bring them to the ceiling rail.
The installation of curtains with such a sequence of attaching curtains is especially applicable for high ceilings - from 3 meters or more.
Showcase Okna Body
Which ceiling curtains are better to choose for a particular interior, how to fix a cornice to a plasterboard ceiling or tensile structure? Today we will try to answer these questions for you.
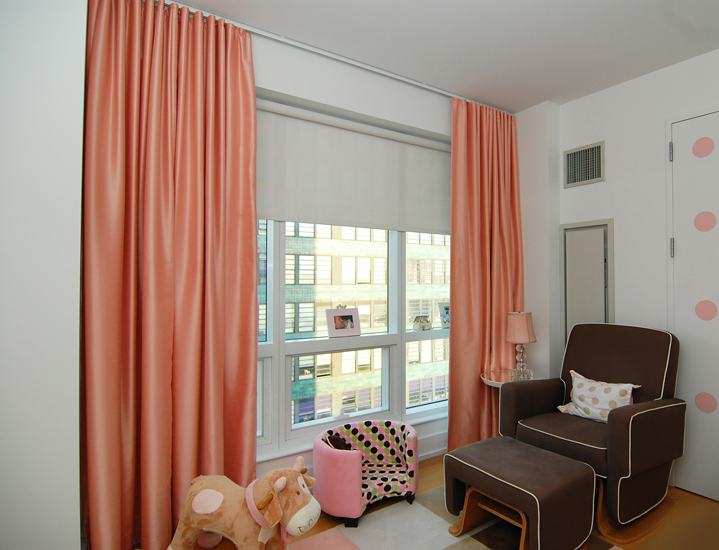
The ceiling curtain should harmoniously fit into the overall interior of the room. An equally important factor is the reliability of fastening.
Choice problems
Before the curtains are fixed, they must be purchased. But how to make right choice among all the variety provided on the market?
Design
Everything is quite simple here. Do not chase a lot of bright colors. Designers claim that a room that uses more than 3 primary colors is absolutely bad taste. The only exception in this case may be the use of black or white color when decorating the interior.
Thus, when choosing the color of curtains, you can often stop at the following options:
- black or white curtains;
- under the color of the ceiling;
- the color of the walls.
A similar principle should be followed when choosing curtains.
Black curtains go well with black and white curtains and white walls. In addition, curtains to the ceiling should harmoniously fit into the overall concept of the interior. If an antique-stabilized room has a massive chandelier and imitation wood, then it goes without saying that a plastic curtain to the ceiling would be nonsense.
Material
In addition to the stylistic design, the material of your ceiling also affects the choice of curtain material.
- if the ceiling is made of reinforced concrete, then there are no design restrictions. The cornice can be made of various types of wood (even heavy ones), steel, plastic, etc., and the curtains themselves can be very massive;
- but suspended ceilings impose restrictions on the mass of the structure;
- only lightweight structures are installed on plasterboard or PVC ceilings. That is, in this case, you will have to forget about heavy velvet curtains.
Dimensions
What optimal dimensions curtains? For spacious rooms with windows in the length of the wall, curtains should be preferred, which are 50-60 cm wider than the window opening. Overlapping the wall is necessary so that the sun's rays, which will penetrate at an angle, cannot enter the room.
If the room is narrow and the window is located in a shorter wall, then the curtain should be slightly narrower than the window wall. Due to the drapery along the entire wall, the room will visually be wider.
Mounting
How to attach the curtain to the ceiling, depending on the material from which it is made?
Let's consider the simplest case, namely a reinforced concrete ceiling. You should not have any problems installing curtains in such an overlap. But a puncher should be used, and dowels with screws are used to fix the structure.
First you need to find the middle of the window opening. If the curtain has a length equal to the width of the wall, then, accordingly, we find its middle. We mark this point on the ceiling. The fastening of the ceiling curtain will be at a distance of 10 cm from its edge. But it should be understood that this is only suitable for the most common option, namely a plastic curtain. Other types of structures are usually sold with pre-drilled mounting holes.
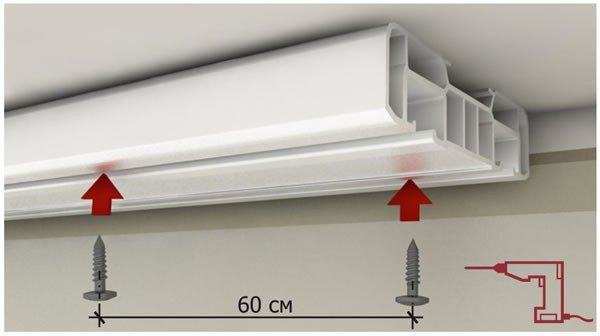
The remaining fastener points are marked so that they have a step of no more than 60 cm from each other. In appropriate places, the curtain itself is drilled, and holes are made in the ceiling. How to screw the curtain to the ceiling? After we drive plastic dowels into the ceiling, the curtain is simply fixed with a screw.
How to hang a ceiling curtain on a plasterboard or PVC ceiling?
There are several ways to attach curtains to this type of ceiling.
The fastening of the curtain to the ceiling must be planned at the stage of assembling the frame. The CD profile strip is attached to the suspensions on the ceiling, as well as with the help of horizontal segments to the wall in the place where it is planned to fix the curtain (read also: "fastening the curtain to the stretch ceiling"). You can also get by with several plywood platforms on hangers for plasterboards. In order to set the mortgages at the desired level, it is necessary to stretch a thread between the walls, oriented along the horizon. It is on it that you can set the correct position of the mortgage.
What will happen the best option? Timber or several plywood blocks? The use of timber guarantees greater strength of the fastening of the ceiling curtain. Therefore, if the curtains are massive, and the curtains are subjected to constant efforts (for example, a child will pull them), then such a design will be able to steadfastly survive all the impacts. But it should be noted that when the temperature and humidity change, the beam can lead, which will directly affect both the appearance of the curtain itself and the evenness of the canvas.
At the same time, plywood on hangers does not change its size and shape under the influence of temperature and humidity. But the weight of the curtains will have to be reduced.
After you install the canvas, at the attachment points of the curtains, it is necessary to reinforce the surface with special rings or ordinary tape. Now the curtain itself can be fixed directly through the canvas.
Conclusion
Well, now you know how to install a ceiling curtain. If you want to see the difference between wall and ceiling curtains, then you can view photos from our album. You can also see the difference between different types of fasteners. We wish you success in the repair and decoration of your premises.
That's the repair and finishing work left behind. The choice of curtains and cornices according to your idea is carried out. The next step is the installation of curtain rods. Their purpose is not limited to a practical function. In design modern apartment or cottage cornice should be considered primarily as an addition to the interior. An experienced home master can handle any task - whether it is the installation of a string cornice or a lifting mechanism for Roman blinds. But for beginners, nevertheless, it is recommended to start with the installation of round cornices, which include all the necessary fasteners.
Depending on what materials they are made of, cornices can be metal, plastic or wood. According to the type of construction, they are divided into single-row (only curtains or only tulle), two-row (both curtains and tulle) and three-row (curtains, tulle and lambrequin). Of course, the installation of multi-row structures will require more experience and skill, but it gives more scope for creating extraordinary volumetric compositions.
Installation of curtain rods
When carrying out installation, an inexperienced master may have a question: how to make a curtain rod reliable. It must be remembered that what harder design eaves, the more its weight. So, the stronger should be the surface on which the installation will be performed. Otherwise, the probability of collapse of the structure increases. Therefore, sometimes you have to sacrifice the aesthetic aspect in favor of the safety of loved ones and choose a lighter design.
To make heavy curtains more secure, you can add a small amount of epoxy resin to the hole prepared for self-tapping screws and insert fasteners. Installation of the cornice is continued after the resin has completely dried.
The following tools and materials will help to significantly speed up the process of installing the eaves:
- ladder;
- perforator;
- screwdriver;
- pencil and tape measure;
- dowels with self-tapping screws;
- construction level (level).
Before starting installation, you need to make sure that the cornice does not interfere with opening the window. Another important point- so that the curtain does not lie on the window sill, the brackets must exceed its protruding part in length. It is necessary to take into account the dimensions of the heating pipe if it runs along the wall at the location of the eaves.
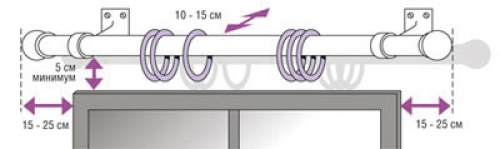
When marking under the brackets using a tape measure and a level, pay attention to the distance along the edges of the window opening. It should be the same, except for the case when the installation of the eaves is carried out along the entire wall.
Usually, the installation of a wooden or plastic cornice bracket is carried out with one self-tapping screw and a dowel, and a metal one with three.
First you need to drill holes for the dowel and install it there. Then the bracket is fixed with screws. Before the second bracket is fixed, check the distance again. After docking with the rod, you should check the reliability of the connection.
Rings on the bar are put on in advance. The rod is fixed in such a way that one ring remains behind the bracket (in front of the tip) on each side. It is much more convenient to first put the hooks on the curtain, and only then attach it to the rings.
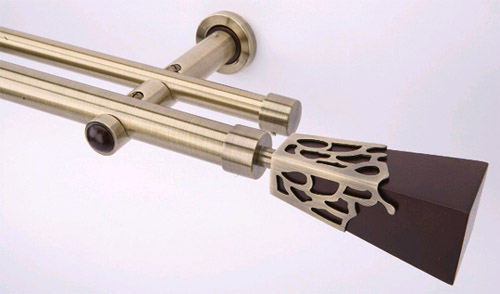
On each edge of the rod, you can wear decorative fleurons. A variety of decorative elements along the edges of the rod will not allow the last ring with the curtain to slip off.
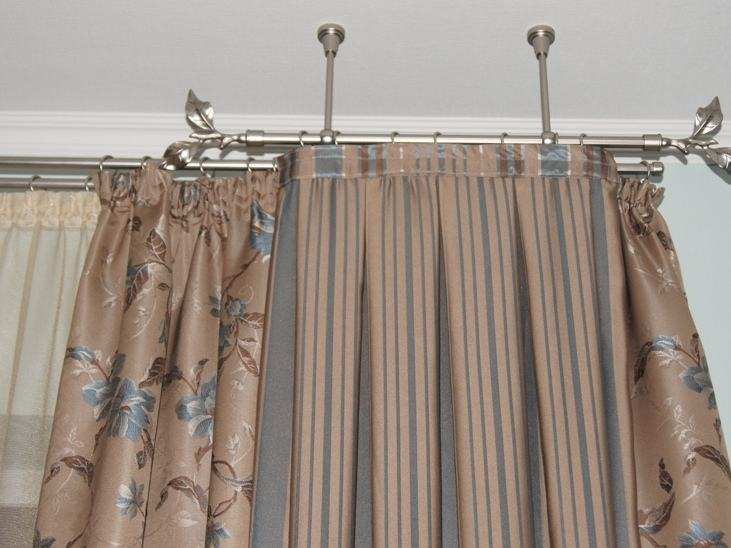
Installation of round cornices
Even if you have no experience in installing cornices, do not be afraid to try to do it yourself. Many salons selling curtains and even builders provide such a service as installing curtain rods (the price depends on the length and model of the curtain rod).
When buying a cornice, check the presence of fasteners. Sometimes it is better to replace the standard fasteners with a more suitable one. For installation in loose walls, you will need self-tapping screws and dowels 5 * 80.
If the length of the round cornice exceeds 2 m, then a third additional bracket for fixing in the center is indispensable. In this case, it is reasonable to opt for an open-bracket design, where the rod with rings is simply threaded into a small recess. Then it will not be necessary to remove the cornice from the wall every time.
When installing the ceiling cornice, make sure that the curtain protrudes slightly beyond the edge of the window sill and radiator.
To make the folds of the curtains even, use a special tape for edging the upper edge, equipped with cords for assembly, tighten the curtain by adjusting the size of the folds, and only after that, rings are put on every 10 cm.
Installing a rail cornice
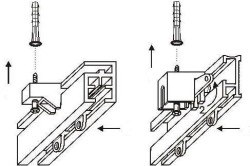
It is possible to mount the rail target cornice both to the wall and to the ceiling. The flexibility of the design allows you to install such cornices on bay windows and other non-standard window openings. Rail curtain rods are supplied complete with screws, brackets, stoppers, sliders and rings to prevent slipping, rollers and hooks.
The most recent of model range rail cornices are equipped with a mechanism for "overlapping" the runners, which allows, if necessary, to close the curtains with an overlap. Such a cornice looks less massive and fits well into the interior. But, unfortunately, such a mount is only suitable for curtains made of light fabric.
The installation of the rail cornice also begins with markings. When installing the cornice on the wall, the edges of the brackets are placed 5-7 cm above the window opening. When mounted on the ceiling, the distance from the wall depends on the features of the layout, as well as the size of the heating radiators and should be at least 10 cm.
In the process of mounting the rail cornice above the bay window, marking with a tape measure is somewhat difficult. Everything must be measured carefully. Therefore, in order to determine the location of fasteners, it is better to use a level.
In addition to the extreme points of the rail, it is necessary to note the places where the brackets are installed. To do this, you need to put marks on equal segments (about 25 cm) along the entire length. In the marked places, you will need to drill a hole, and then, using the screws included in the kit, carefully screw the bracket.
Now a rail must be attached to the front side of each bracket. At the final stage of installation, you need to tighten the adjusting screws located on the brackets along the entire rail. Only then are limits set.
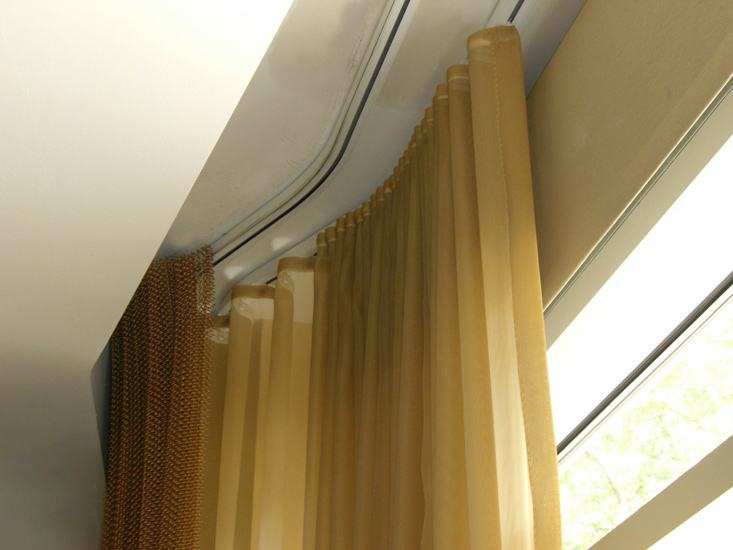
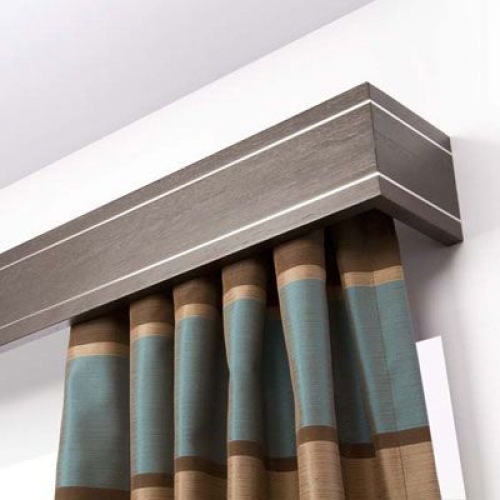
Installation of a profile cornice
Profile cornices are often installed on the ceiling. Although, it is possible to carry out installation on the wall. The coloring can be any - from golden to a shade of dark wood. If you pick up a cornice to match the ceiling, it will be almost invisible. Profile cornices can be equipped with a mechanical drive, which is especially important if the long length of the curtains does not allow you to open the window manually. In expensive models, the elements for fastening curtains inside the profile are covered with teflon. This design improves the sliding of the rings in the recesses in the base.
The installation of the profile cornice is carried out in the same sequence as the rail and in the same way - on self-tapping screws with dowels. Curtains are attached to the base with Velcro or rings.
Installing a string cornice
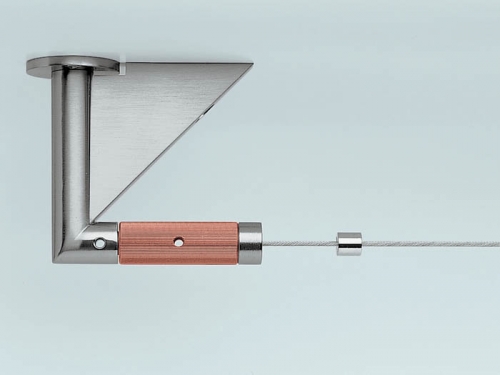
As a basis for fastening the curtains of such a cornice, a string made of a steel or polymer thin cable acts. This type of cornice is not suitable for hanging tapestry fabric and other heavy curtains. The cable, of course, is able to withstand such loads, but pulling it so hard that there is no sagging in the center will be difficult in this case.
String cornices are often placed on the ceiling. They can be single or multi-row.
The factory packaging contains everything you need for installation: two boxes with a tension mechanism, strings, clips or hooks, as well as dowels and self-tapping screws.
Dowels are hammered into the holes in the ceiling, and then the fasteners are screwed. A string is threaded into the mounts and fixed with a tensioner. After that, the structure is closed with plastic boxes. Then the clamps collect the upper edge of the curtains.
Installation of baguette cornice
This device is a hollow ceiling rail connected to a baguette strip made of wood or polymers with sidewalls. Self-tapping screws, dowels, plugs (used to disguise holes for screws) and fabric hooks are also included.
First you need to assemble the structure according to the manufacturer's scheme: connect the baguette bar and the tire. Inserts in the form of corners are attached to the sidewalls, and then the base is attached.
In pre-marked places, holes for dowels are made. The structure is attached to the wall with brackets, and the cornice itself is screwed to the ceiling with the upper plane. Sometimes the baguette cornice is attached only to the wall.
After mounting the base of the eaves, you can proceed to fasten the draperies. The lambrequin is fixed to the facade of the cornice with a special adhesive tape sewn to the fabric. Curtains collect curtain tape in folds, put on hooks with rollers. The rollers are threaded into the holes of the tire, after which the sidewalls are closed with special stoppers.
Installation of a cornice on drywall
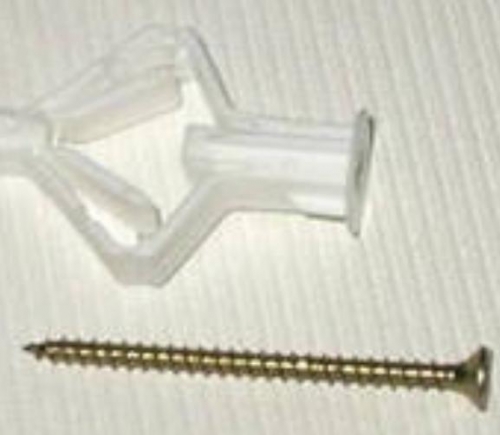
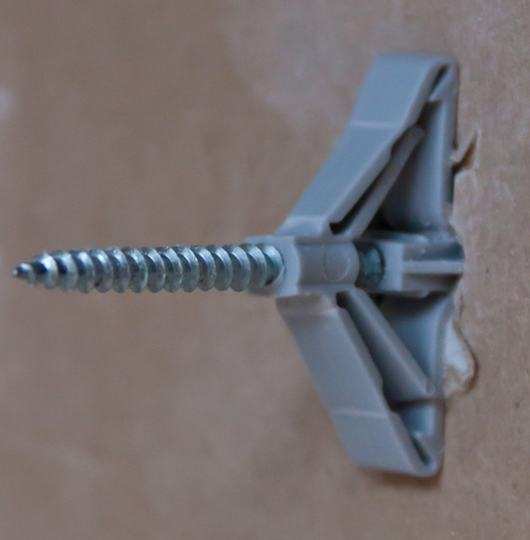
Installing a cornice on drywall involves the same set of works. Only one nuance. In order for the cornice (any) to be fixed firmly, special dowels for drywall are used - a butterfly or a molly dowel with a characteristic ability to straighten the side planes, thereby contributing to a more reliable fastening of the product. It is worth considering that even this type of dowel can withstand loads of no more than 5 kg for ceiling and a maximum of 8 kg for wall mounting.
Installation of a cornice in the cavity of a stretch ceiling
The owners of stretch ceilings will have to install the cornices differently. If the cornice is located in the cavity of the ceiling, the basis for fastening will be a beam, the length of which corresponds to the dimensions of the cornice, and the thickness is slightly less than the distance from the base ceiling to the film surface.
The beam is fixed using dowels. After mounting the frame of the stretch ceiling and installing the canvas, markings are applied at the points of fastening of the beam. Then rings are attached to the place of future punctures so that the canvas does not tear. Holes inside the ring are carefully burned. Now you can attach the cornice.
Proposals from manufacturers are varied. You can choose models of curtains in any of stylistic trends- be it modern, simple-minded, but no less original country motifs, functional high-tech or restraint and aristocracy English style. The choice of cornices and the method of their fastening depend on the style of the room, the chosen textiles, the material from which the ceiling and walls are made.