- Advantages of drywall for kitchen renovation
- Drywall types
- Important points at work
Renovating a kitchen is no easy task. Especially when the appearance of walls and ceilings leaves much to be desired. This applies not only to old apartments, but also to new buildings. The question arises: which option is most appropriate for finishing this room. The main ways are the leveling of surfaces under the lighthouse - a "raw" method or the installation of hinged structures, which significantly expand the scope of the design project. In this article we will talk about a universal and simple material in terms of installation.
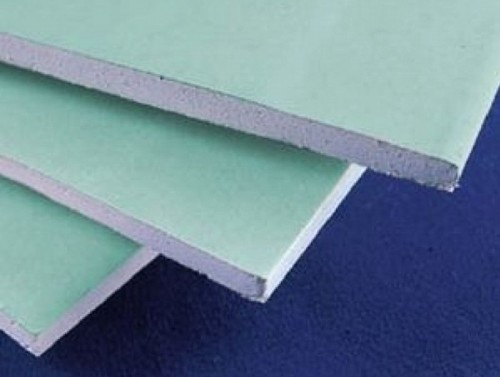
Drywall is a finishing material consisting of two sheets of building cardboard, between which a gypsum layer is laid.
Advantages of drywall for kitchen renovation
- good heat and sound insulation;
- resistance to temperature changes and high humidity;
- short installation time;
- durability;
- the ability to absorb and release moisture (indoor climate control);
- environmental Safety;
- perfectly smooth surface (walls and ceiling);
- "dry", clean work;
- any design (plasticity);
- hides all communications (wires, gas pipe, ventilation);
- the possibility of interesting both on the walls and on the ceiling.
If you have planned complex or interesting design bends of the walls, then it will be difficult to implement your plan for the first time with your own hands.
Most in the kitchen you can mount yourself. Consider the order of work.
![]()
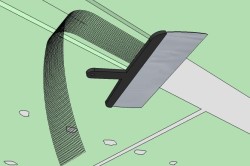
The main advantage, due to which drywall is used as a finishing material, is plasticity, which allows it to be bent to create curved surfaces.
- creation of a project with the calculation of the areas of all working surfaces (design project);
- determination of the type and size of the drywall sheet;
- for kitchen, profiles, components for installation;
- marking the working plane by level;
- surface preparation, priming;
- installation of a metal frame from profiles (this article discusses a metal frame);
- laying communications, filling cavities with insulation (if desired);
- cutting GKL for subsequent installation;
- finishing works (priming, puttying, design).
Standard sheet sizes:
- width: 600 or 1200 mm;
- thickness: 6.5, 8, 9.5, 12.5, 14, 16, 18, 20, 24 mm;
- length: from 2000 to 4000 mm. Pitch 50 mm.
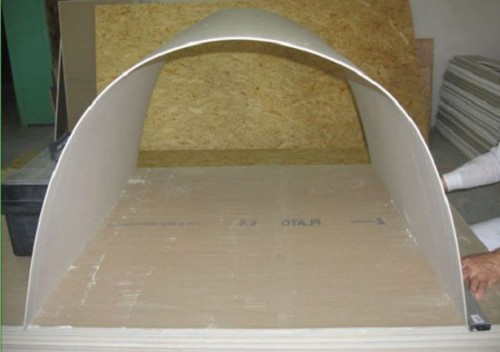
The most common dimensions are: length 2500 mm, width 1200 mm, thickness 12.5 mm (walls) and 9.5 mm (ceiling). Ceiling plasterboard is always thinner and lighter than wall plasterboard. A difference in thickness of 3 cm lightens the sheet by 12 kg. GKL 6 mm thick is suitable for arches and curved structures. Using this drywall, you can create any design of a curved wall, partition, arch in the kitchen.
Back to index
Drywall types

- GKL - normal, gray, blue marking;
- GKLV - moisture resistant, green, blue marking (not suitable for the kitchen if bent structures are expected);
- GKLO - refractory, gray, red marking;
- GKLVO - moisture resistant, fireproof, green, red marking.
For a kitchen with normal humidity, ordinary drywall is suitable. The last two types are practically not used for facing apartments. Moisture resistant GKL is used more often for bathrooms and kitchens with high humidity.
Drywall can be glued to special compounds directly on the walls, however, this method is short-lived, unreliable and does not allow you to hide kitchen communications. can be different: gypsum (GKL, cut into slats), wood or metal. The metal frame (made of galvanized steel) is the most reliable, durable and easy to use.
Profile for a metal frame on the ceiling:
- CD 60 * 27 mm (PP profile) - main (frame, sheets are attached to it);
- UD 28*27 mm (PNP profile) - guiding profile (fits along the perimeter of the ceiling, the PP profile is inserted into it);

Length: 2750, 3000, 4000, 4500 mm.
Profile for a metal frame on the walls:
- CW 50, 75, 100 (50*50 mm, 75*50 mm, 100*50 mm) - PS profile. Vertical, main, mounted at a distance of 40-60 cm from each other;
- UW 50, 75, 100 (50 * 40 mm, 75 * 40 mm, 100 * 40 mm) PN profile - guide, horizontal (attached to the floor and ceiling, it alternately includes vertical racks).
Length: 2750, 3000, 4000, 4500, 6000 mm.
To create a structure, in other words, you need two types of profile: the main one for the frame and the guide, this applies to both walls and ceilings.
Back to index
Important points at work
- Calculation of the number of sheets: the area of all working surfaces, not subtracting windows and openings, plus 10% (divided by the sheet area).
- GKL must be stored in a horizontal position, otherwise it is deformed.
- If the ceiling is complex design, with bends - only a sheet 6 mm thick will do.
- Ceiling: the distance between the sheets should be 2-3 mm, to fill the joints with putty. There should be a gap of 2-3 cm from the wall so that the structure has little mobility. For this, self-tapping screws must also be screwed in from the edge of the sheet at a distance of 10 cm.
- Walls: GKL are attached to the frame with self-tapping screws with a pitch of 250 mm and a distance of 1.5 cm from the edge of the sheet. Important: if horizontal seams are obtained, they must be shifted in height by 40 cm. The edges of the adjoining sheets are attached to one rack. The edge of the sheet must be at least 20 cm away from the corner. Communications under drywall must be insulated (corrugated, electrical tape).
- There must be a distance between the sheet and the floor to protect the GKL from moisture and cracks. Plasterboard sheets are attached from the corner. Be careful that the screws are screwed in at a right angle, otherwise the surface will be uneven. You also need to slightly recess the screws in drywall - by about 0.5-1 mm. If you screwed in the screw incorrectly, another one will not take its place, place it next to it.

Tools for the job
- perforator;
- screwdriver;
- hydraulic level or laser level - for marking horizontal lines.
- paint thread - used for marking for a perfectly even line on a wall or ceiling;
- knife with retractable blades - GKL cutting;
- planer for drywall - for grinding the GKL sheet after trimming. Sandpaper is used instead;
- putty knife;
- special scissors for metal - profile cutting;
- roulette;
- hacksaw for plasterboard - for curly cutting.
Accessories, fasteners:
- frame profile: main and guide;
- U - shaped direct suspensions (attached both to the walls and to the ceiling - 5 pieces per 3 m of the profile);
- self-tapping screws for plasterboard (60 pieces per 1 sheet);
- dowel nails;
- cruciform profile connectors - "crabs";
- cutter - useful and convenient;
- shock-absorbing tape on the profile if desired;
- insulation, isover (if desired).
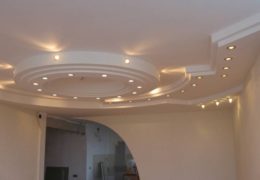
So, drywall and kitchen are very compatible. The use of this material will allow you to embody bold design ideas and change the room beyond recognition. Multi-level plasterboard ceilings will allow you to highlight the working areas of the kitchen, apply unusual lighting. The material is easy to use and easy to install.
- The process of installing plasterboard ceiling in the kitchen
- Materials and tools required for installation
For some reason, many people think that anything is possible, but not drywall. Because the kitchen is a room with constantly changing temperature and high humidity, and drywall is a delicate material and will not tolerate such sharp contrasts.
To finish the ceiling in the kitchen, you must use moisture-resistant drywall.
This is not true! Today, even in the bathroom, it is possible to finish the ceiling with plasterboard, to say nothing of the kitchen.
Gypsum board has a lot of advantages: in addition to freedom of action in interior design, it is an environmentally friendly material, and this fact is very relevant especially for residents of megacities.
Finishing material, which will be used for repairs in the kitchen, must meet increased requirements. In the case of drywall, it must be moisture resistant. All other actions, from installation to decoration and painting, are performed as if they were performed in any other room.
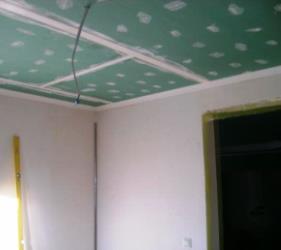
The process of installing plasterboard ceiling in the kitchen
First, it is necessary to mark the ceiling with a level and determine the attachment points for profiles and suspensions.
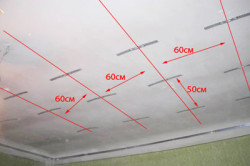
First you need to make a clear markup around the perimeter of the room. To do this, an indent of 10-15 cm is made from the main ceiling (it all depends on the height of the ceilings of the room itself) and using a laser level, an even line is drawn - markings, along all walls. It is very important not to make a mistake and the resulting line should eventually close.
The next step will be marking the ceiling itself. Here you will mark the mounting points for the U-shaped suspensions. The indent from each suspension is 50 - 60 cm. As a result, you will get something like a grid with the same squares on the ceiling.
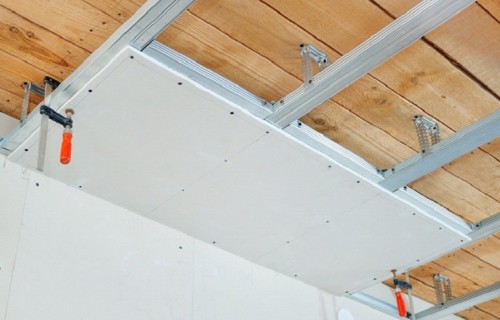
After marking, you can safely proceed to the installation of the frame. And here, too, there is one caveat: you will need two different kind profile. A UD profile is attached to the walls, and a CD profile is attached to the ceiling, or rather to U-shaped suspensions. To fasten the profile to the wall, it is better to use dowels and anchor bolts, and for the CD profile, you can use self-tapping screws. When laying the profiles according to the markup, make sure that the distance between them corresponds to the marks left.
After the frame is ready, the drywall installation process begins. The gypsum board is fastened to the profile with self-tapping screws. During installation, the distance between the screws should be 20 or 30 cm. If the sheet has a large mass, the step can be reduced. Thus, the remaining drywall sheets can be attached to the frame.
Ceiling finish. We carefully prime the ceiling, after which we apply a layer of putty.
To seal the joints of drywall sheets, a reinforcing tape for putty or a special putty for grouting is used.
Where the joints between the drywall sheets will be puttied, we glue a masking bandage or reinforcing tape. Or you can use a special putty for joints, then there is no need for a masking bandage and reinforcing tape. It is necessary to putty until the surface becomes perfectly flat, and the joints are not noticeable.
After the ceiling has gone through the puttying process and dried thoroughly, you can start grinding. It is made using a grinding grid, which has different numbers.
Coloring. also requires special materials. For rooms with high humidity, experts recommend the following types of paints: acrylic, silicate or silicone.
When you decide to make repairs in the kitchen, you need to start with the choice of material. Today, most people prefer to make plasterboard ceilings. This material makes it possible to create a unique masterpiece on the ceiling.
If the repair will be carried out in the kitchen, then it is necessary to choose the material based on the needs of this room. Fortunately, drywall has the necessary properties to meet all the requirements of the kitchen space.
The kitchen, like the bathroom with a toilet, has its own specific requirements, which must be met by the material used here. The list of such requirements includes:
- good resistance to high humidity;
- the material must withstand sudden changes in temperature;
- strength and durability;
- the ability to easily apply a finish to the surface in the form ceramic tiles, water-repellent paint or wallpaper.
Drywall is more than suitable for these requirements.
Note! The kitchen needs a special type of drywall sheets that meets the above requirements.
Let's go in order
Before choosing drywall for finishing the ceiling in the kitchen according to its properties, you need to select the sheets according to their destination.
At the moment, drywall sheets, depending on their purpose, are divided into the following types:
- wall;
Sheets for walls
- arched;
 arched sheets
- ceiling.
 Ceiling sheets
All sheets have characteristic properties that allow the material to be applied in certain places. The differences mostly lie in the weight of the sheets, as well as their flexibility.
As the name implies, it is necessary to use ceiling sheets to finish the ceiling in the kitchen.
Of course, if there is a simple ceiling design, wall drywall can also be used. But for more voluminous and multi-level devices, only the ceiling type is needed, since it will weigh much less and will not overload the entire structure. Yes, and the ceiling sheets will be used much better.
Decide on the type of drywall
Drywall, as one of the types of finishing materials for interior work, has several standard options with different properties. Different sheets are better suited for different rooms.
Today you can buy drywall of the following types:
- standard. Such sheets are used in rooms where there is a normal microclimate;
 Standard sheets
- fire resistant. This material should be used in rooms where there is a fire hazardous and dry microclimate;
- fire and moisture resistant. Such material has both moisture resistant and refractory properties. Therefore, it can be mounted on the ceiling or walls in rooms where there is a dry and humid microclimate;
- moisture resistant. This type is suitable for installation in rooms where a humid microclimate prevails, as well as sharp temperature changes.
 Moisture resistant sheets
Based on the rooms in which each specific type of drywall is used, you can easily determine what material is needed to finish the ceiling in the kitchen. Of course, this is a moisture resistant type. It is he who will be better than the rest of the sheets to cope with their direct duties.
 Water repellent paint
It is worth noting that moisture-resistant drywall is distinguished from the other three types of components that make up the gypsum core. In the production of moisture-resistant drywall, special antifungal additives are used, which are added to the gypsum core and which are used to treat the layers of cardboard from the outside. In this case, the sheets are made using impregnated cardboard. Thanks to this, after external treatment with antiseptic agents and deep penetration primer, mold or fungus will not appear on the plates.
In addition, gypsum contains silicone granules in its composition. They allow the material to maintain a neutral environment at high humidity and not react with moisture.
Nevertheless, despite this, experts recommend not to be lazy to make an additional final finish, which can act as a barrier between drywall boards and the humid microclimate of the room.
What finish is best to use when it comes to the final design of the ceiling in the kitchen? In this situation, drywall, after sealing the seams with sickle and putty, can be finished with water-repellent paint. This is the most rational and common option for exterior decoration. The paint will give your ceiling bright colors and allow you to highlight its curly elements in various shades or color combinations.
Much less often, drywall in the kitchen is pasted over with special waterproof wallpaper.
Due to its moisture resistant properties, this plasterboard ceiling will last in the kitchen for a very long time and will remain beautiful all this time.
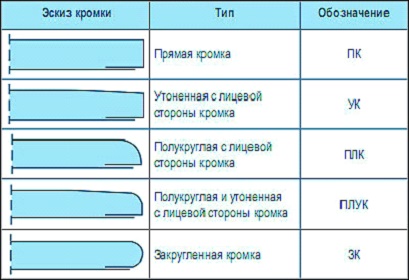
If we figured out the required type of drywall, as well as its main properties, then one more aspect of drywall sheets remained unclear - the edge. It is this question that the seller of the hardware store will ask you at the end when selecting the required material to form the ceiling in the kitchen.
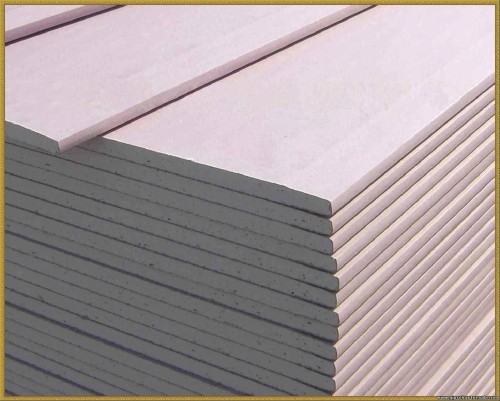
Drywall can have the following types of edges:
- straight edge or PC. It is designed for dry installation, which is carried out without laying joints. PC is suitable for the construction of multi-level ceilings when creating the inner layer;
- thinned edge or UK. Such sheets during the final finishing require the application of a special reinforcing tape (sickle) to the joints. Already on top of the glued tape, all joints should be smeared with putty and sanded with sandpaper;
- rounded edge or ZK. This edge allows you to form joints without the use of reinforcing tape. Here, the finishing of the joints can be carried out immediately with putty;
- refined and semi-circular edge or PLUK. When using sheets with such an edge, initial processing of the joints with a reinforcing tape is necessary. After that, puttying of all joints and places for screwing screws is required.
 Edge types
Most often, plasterboard sheets with a PLUK or UK edge are used to finish the ceiling in the kitchen. The presence of such edges allows you to bring the level of the ceiling as evenly as possible and do everything so that the joints between the plates are almost invisible.
In any case, the selection of the edge should be made based on which arrangement the constructed drywall ceiling will have, as well as the final finish of the overall structure. This is the only way you will be able to create not only a beautiful, but also a high-quality ceiling in your kitchen.
Summing up
So, to assemble a multi-level ceiling in the kitchen, you should use a ceiling moisture-resistant drywall with a UK or PLUK edge. Ceiling sheets in this situation will be the most the best option, since their weight is much less than wall plates, and the thickness will be only 9.5 mm, in contrast to 12.5 mm for the standard. Its use will make it possible to lighten the entire structure and use curly elements on it.
Note! It is possible to increase the strength of a multi-level structure by assembling a more rigid frame, with an additional crate of the entire working surface.
With a simple single-level ceiling, standard sheets of material can also be used, since the design idea does not provide for a significant load on the ceiling.
Regardless of the complexity of the planned ceiling device, you should always choose only moisture-resistant sheets. Only in this way will your ceiling serve faithfully for many years, retaining its original appearance unchanged.
Related Articles
 How to make a multi-level plasterboard ceiling
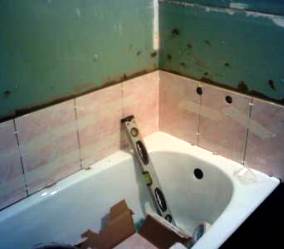
Traditional tiled ceramics used for finishing the bathroom, in addition to its own high cost, requires significant costs for the preparation of the base. Leveling the surface with plaster, processing with primers, searching for compatible materials, all these problems can be solved using gypsum plasterboard materials and their installation technologies. Which drywall is best for the bathroom, this is the topic of our publication.
Drywall in the bathroom is a common occurrence today. You can use affordable, easy to install, durable material as the base for any decor, including tile.
The practice of using moisture-resistant drywall
High humidity in the bathroom volume excludes the use of standard drywall sheets. Such facing coatings absorb moisture, which adversely affects their strength and resistance to external influences. The subject of your attention can only be moisture-resistant drywall, originally oriented to operation in a humid environment.
The special properties of this material are widely used in construction and finishing technologies. The strength of the panels determines their suitability for wall and ceiling finishing works, the construction of light internal partitions, the creation of interior design elements for kitchens and bathrooms.
Moisture-resistant drywall sold on the construction market under the name GKLV has a standard design. The material received special properties due to the presence of a fiberglass component in the gypsum filler and the hydrophobization of the cardboard cover. Direct long-term contact of the material with water is undesirable, but the impact of hot steam, water splashes, moisture-resistant material transfers without consequences.
The panels are produced in several size categories depending on the height of the walls; panels up to 3 meters long can be used. The material is easy to recognize by the markings and the characteristic greenish tint. Wall, ceiling and arched panels, with different thicknesses, weights and flexibility, allow you to implement quite complex finishing and decorating work with optimal costs of working time and money.

Features of wall and ceiling mounting panels
On sufficiently dry and even concrete and brick walls, panels in one- or two-layer versions are fastened with a moisture-resistant gypsum-polymer mixture of dry adhesive GOST, on wood and foam concrete structures - with mechanical fasteners. Given the difficult operating conditions, it is better to mount wall and ceiling panels on a metal frame made of a corrosion-resistant metal profile.
The composition of the ceiling carrier system includes mounting parts that determine the possibility of hanging plasterboard lining to the ceiling. The disadvantage of frame installation is a slight decrease in the area and volume of the bathroom, which is fully compensated by the quality of the plasterboard coating.
- To positive properties drywall constructions are highly maintainable. Minor damage, including through damage, are sealed with moisture-resistant putty and a connecting tape, large-scale damage is eliminated by replacing the entire panel.
- The strength of drywall allows you to use the cladding as a base for laying tiles. The excellent adhesion of the cardboard cover to the tile adhesive allows the use of primers or reinforcing meshes only in selected cases.
What are the features of installing moisture-resistant drywall?
The fiberglass component of the gypsum filler makes it difficult to screw in self-tapping screws, so for bulk work it is better to use a screwdriver. When buying self-tapping screws, pay attention to the quality of the anti-corrosion coating. Treat the heads of the wrapped fasteners with a moisture-resistant varnish.