Stretch ceiling lighting with LED strip
A lot of material on lighting has accumulated, I am gradually posting it. Today, the article will be not so much on LED lighting, but on design.
LED strips are used for decorative lighting of the ceiling and local lighting more and more, and it’s not for me to talk about it - there are a lot of advertising sites in RuNet. Mine is the lighting of a commercial glass showcase.
Recently I did decorative and intimate lighting of the stretch ceiling with LED strip, I really liked it - it takes your breath away! LED Strip Light, installed in the ceiling from the inside - today a fashionable and popular trend, and with this article I will try to present all the information on the topic.
Initially, we have a loggia with a perimeter of 10 meters, and a stretch ceiling is stretched onto the main ceiling (sorry for the tautological expression).
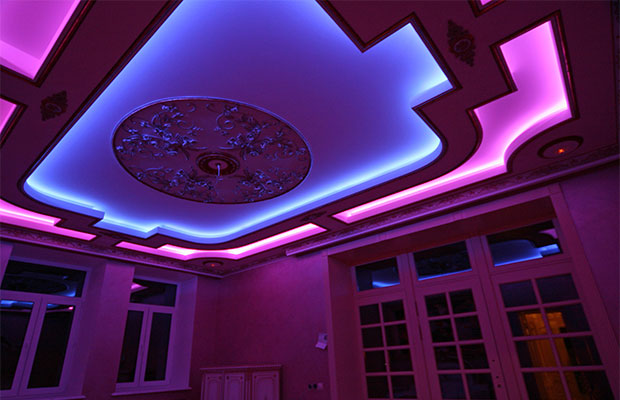
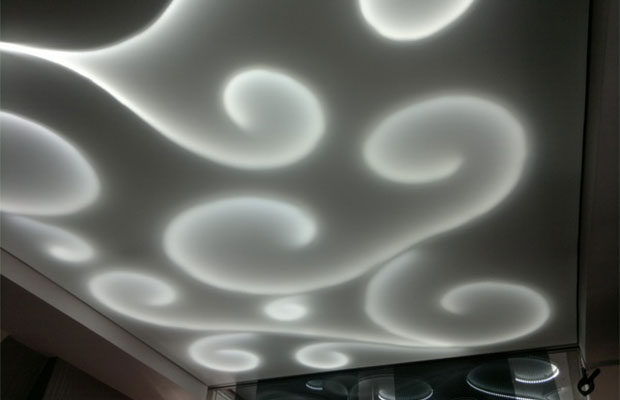
The designer's idea is simple and beautiful - what if the ceiling is made with a print of the starry sky, and a light source is installed in the ceiling - an LED strip? The black sections of the stretch ceiling (sky) do not shine through, and the stars and other luminaries begin to glow when the backlight is on. Exactly like the title photo.
Of course, it is difficult to call this lighting, here we are talking about decorative lighting. Such a ceiling will be good especially in the bedroom ...
There are such solutions on the Internet, but light guides and even crystals are increasingly used there. Yes, probably the stars are brighter and clearer, but the price ...
Installation of LED strip under a stretch ceiling
The implementation of the idea of lighting the ceiling with LED strip began with joining with ceiling and finishers. They pre-fixed their fasteners for the stretch ceiling.
So, after that, I glued two pieces of LED strip 5 meters each directly to this fastener (this is a plastic frame). It turned out just right, without soldering and without cutting.
It is worth noting that the tape may have a low-quality adhesive part, and the tape may peel off after a month. Therefore, before installation, it is necessary to degrease the surface, or better, use your own glue, such as Dragon for plastic, or liquid nails.
Tape connection
Down the cable channel goes the wire (more precisely, the cord) ShVVP-2x0.75 to the power supply. The connection of the wires must be reliable, otherwise it will be problematic to get this place later. It is clear that it is better to tighten the supply wire under the plaster, but then the idea came to the client (as is often the case during the repair process) after.
In this place, there will just be a cabinet on the entire wall, which will close both the cable channel and the power supply. Under no circumstances should the power supply unit be mounted on the ceiling, because this is a serviced unit, in other words, it can burn out and have to be changed. In this case, the power supply for the LED strip is attached to the wall above the baseboard.
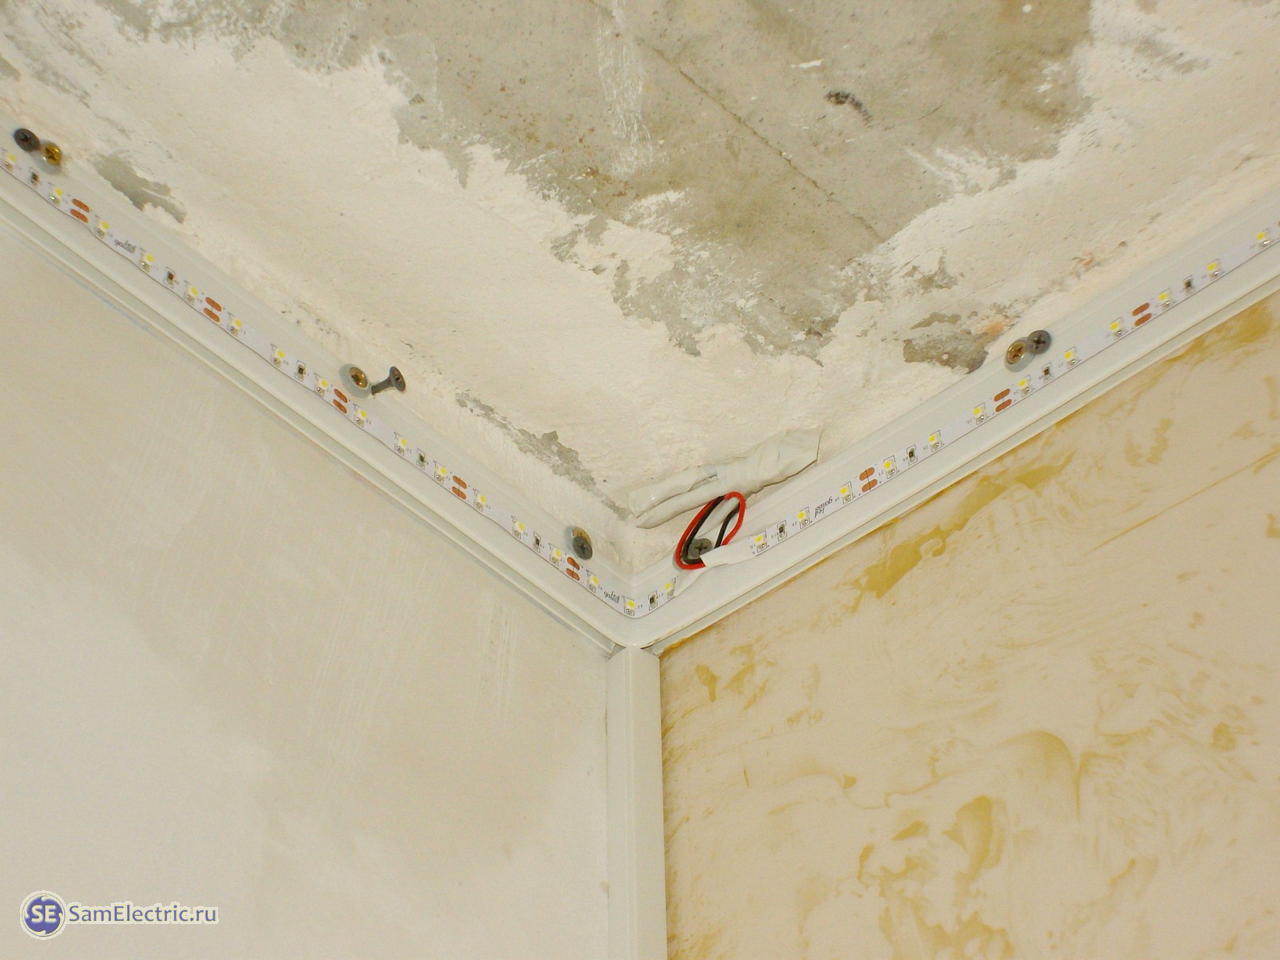
Here is the junction of the power wire and two tapes closer:
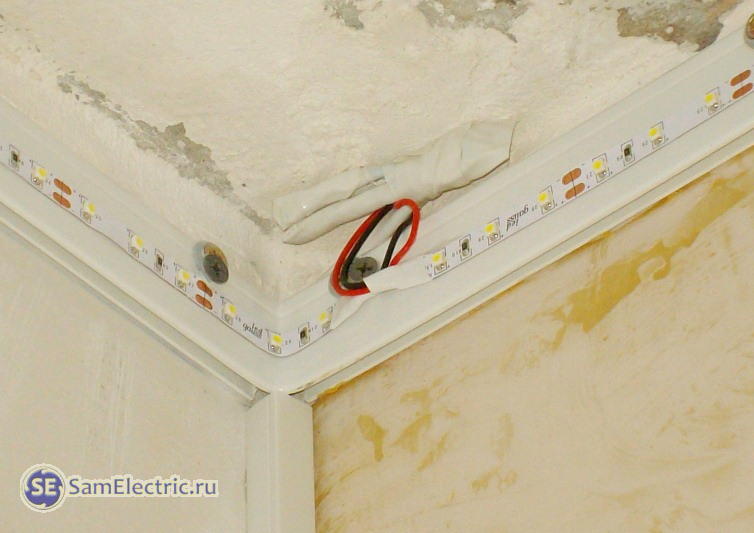
Installation of LED strip to illuminate the stretch ceiling - the junction.
The power supply is installed at the “above the baseboard” level, behind the cabinet, where no one can get it. This is also important for security reasons. More details - on SamElectrica in an article about connecting an LED strip, the link was above.
If the power supply has an output voltage adjustment, then in our case, to increase reliability, it is better to set the voltage at the PSU terminals to about 11.5 - 12.0 V. A couple of tenths of a volt will be lost on the wires.
This project uses 60 W power supply, LED strip Gauss Led, 2 spools of 5 meters, power supply 12 V, 60 leds 3528 per meter, 4.8 watts per meter, not waterproof.
It is important - in order not to experience a feeling of deep disappointment in a year, you need to glue the tape with superglue to the base every meter or more often.
For a stretch ceiling, I do not recommend putting brighter (powerful) LED strips(for example, on 505 diodes) - overheating is possible. The temperature inside the ceiling depends not only on the power and number of LEDs, but also on the cooling and volume of the ceiling (ceiling space). If the gap between stretch ceiling and the floor slab is very small (1-2 cm), it is better not to use the tape - overheating is possible ...
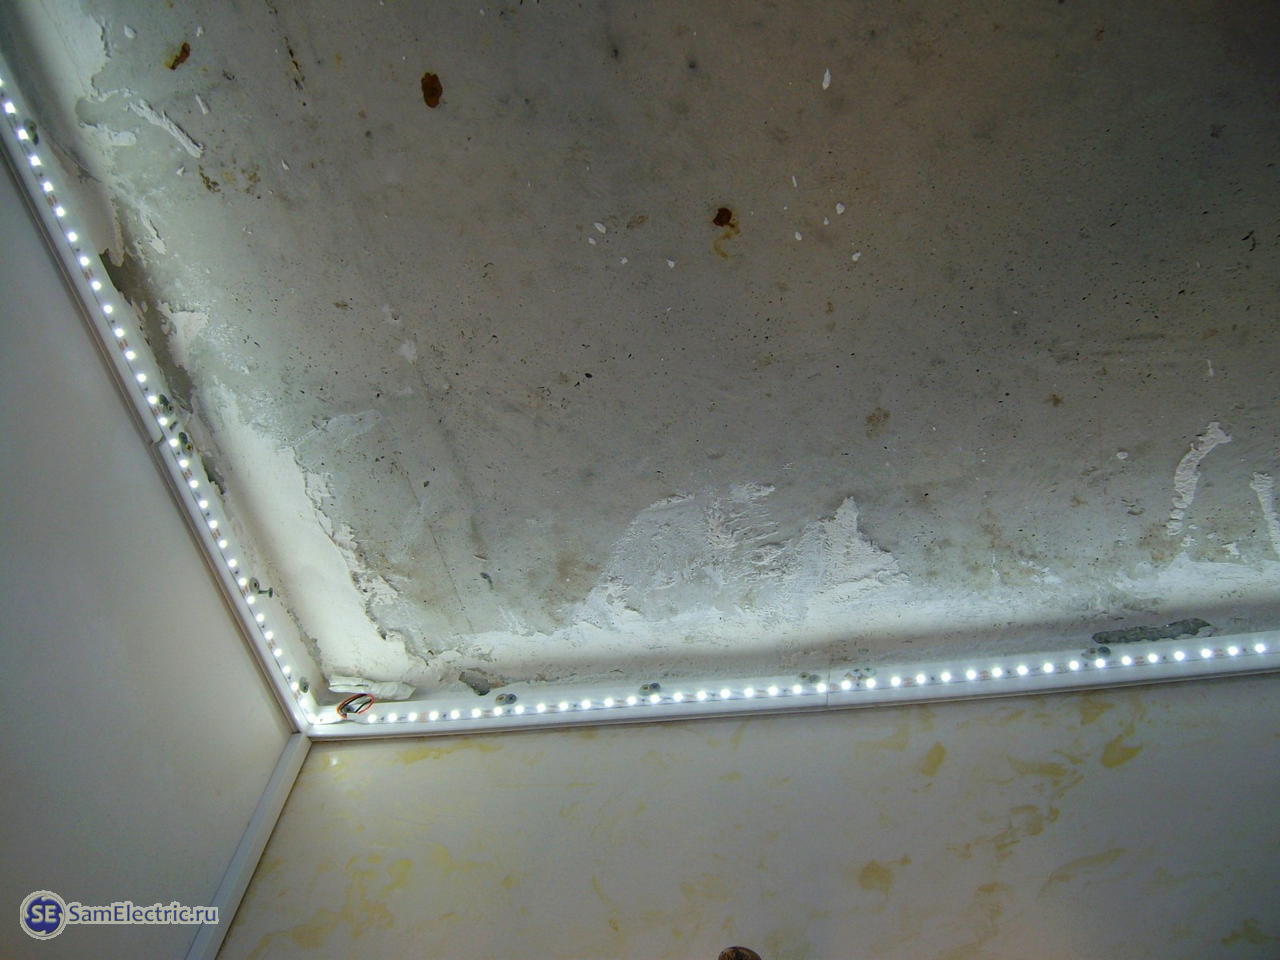
Power is supplied to the LED strip.
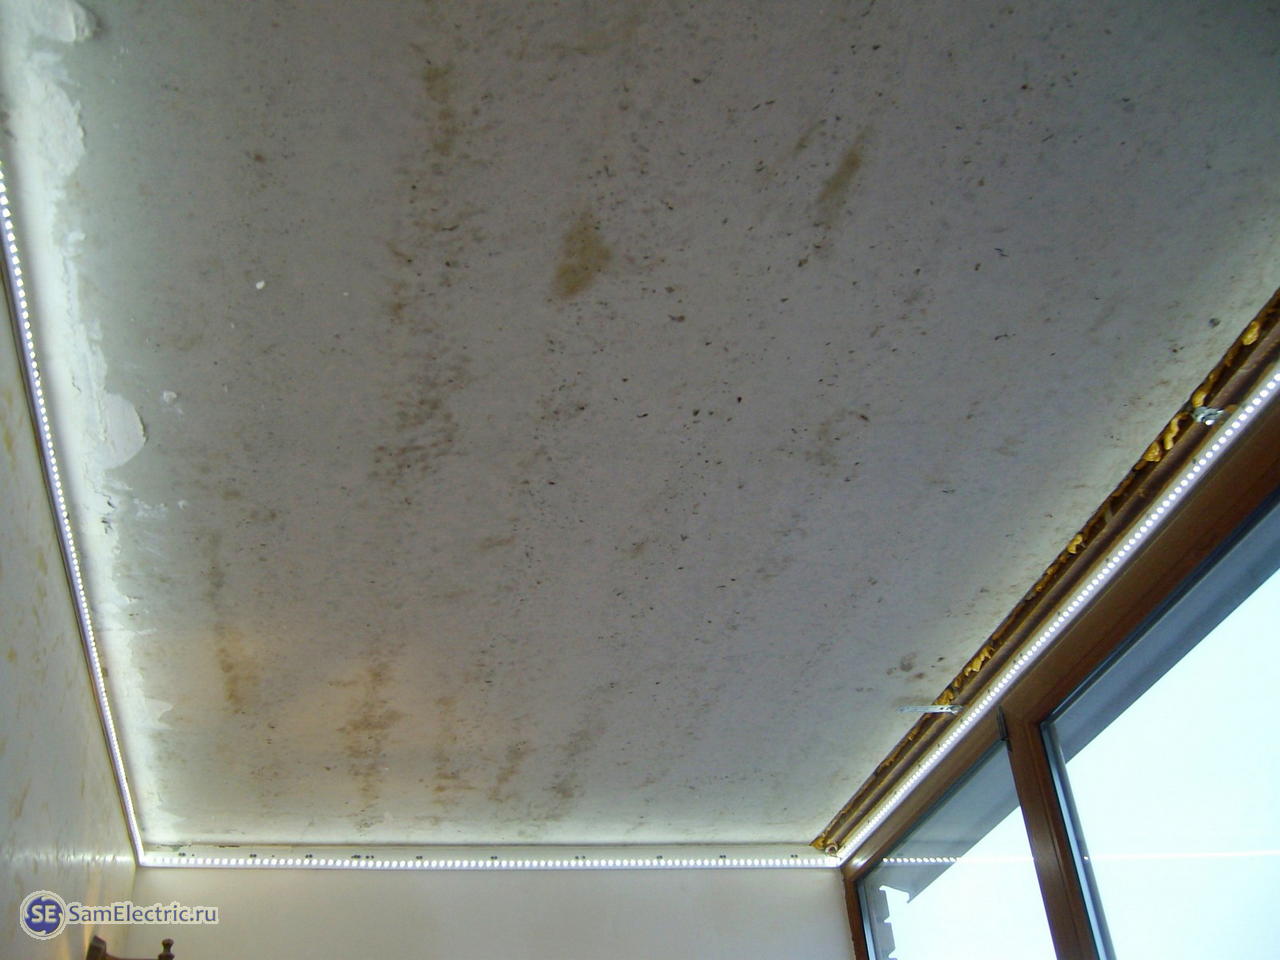

LED strip before installation of a stretch ceiling. (And this is Taganrog. (C) Our Russia)
That's all, and that's it, my work is finished.
Then the concrete slab was painted with white paint, and a stretch ceiling film was stretched a couple of days later.
Unfortunately, I didn’t manage to take the final photo, but I can assure you that the stars and other celestial bodies on the stretch ceiling glow quite naturally. And the black color remains bottomless black. There is a bit of flare around the edges, if you look closely. It would be better to raise the tape higher, to the concrete slab, then the dispersion would be ideal.
This concludes the article, if you have any questions about lighting the stretch ceiling with LED strip, ask them in the comments.
The LED strip under the stretch ceiling not only provides the room with the necessary amount of light, but also improves its visual characteristics - with it, any room becomes attractive and modern.
Parameters and advantages of modern LED strips - what you need to know when choosing a backlight?
Before proceeding with the repair work, you should understand technical specifications lighting equipment on the market.
The most important characteristics of LED strips are:
- 1. The type of LEDs used. LEDs with a different number of crystals can be installed on the tape. Single-color backlights have 1 or 3 crystals.
- 2. Number of LEDs per meter of strip length. Various models of LED strips can have from 30 to 240 lighting elements per meter of length. The fewer LEDs on the tape, the less intense the lighting will be, because tapes with 30 and 60 LEDs per meter are used in the interior for lighting, and LED strips with the number of LEDs per meter from 120 to 240 are suitable for lighting.
- 3. Security. Lighting equipment of this type is presented in two categories of protection from moisture. The first category is ordinary LED strips that do not have special protection. The second is moisture-resistant materials that can be used even in rooms with high humidity.
- 4. Color. LEDs are white, red and adjustable. White and red lamps cannot change their glow color, while adjustable lamps make it possible to create lighting in a room of various colors according to the mood of users.
- 5. Power and voltage in the network. The LEDs operate on AC 220V at 12A DC.
It doesn't have to be uniform at all. To create the desired effect in the interior, you can use various LED strips that allow you to divide the interior space into separate zones.
Wide use led lighting due to the fact that modern lighting devices of this type have numerous advantages:
- 1. Elasticity. The tape on the surface can be given any shape by bending at different angles.
- 2. Small size. LED lights do not take up much space, so they can be installed in a limited space, including for lighting on false ceilings.
- 3. Variety. LED strips of different colors and intensity of radiation can be used to create complex lighting with color transitions and even in the form of curly patterns.
- 4. Low energy consumption. The installation of such lighting is justified not only from an aesthetic, but also from a practical point of view.
- 5. Durability. High-quality lighting fixtures from well-known manufacturers can last more than 10 years.
- 6. Do not emit heat. High temperatures have a negative effect on many building and facing materials, so LED strips can be safely used on PVC products and other surfaces.
- 7. Brightness. Right choice powerful LEDs allows you to create lighting in the room of any intensity and brightness.
But do not think that LED equipment is perfect. It has disadvantages and the main one is the high cost. It is the price that often scares off potential buyers of LED strips, despite all their important advantages and benefits compared to traditional lighting.
Options for creating lighting with LED strip
A wide variety of LED equipment on the market gives owners ample opportunities for arranging lighting in houses and apartments. The most common mounting method is above the ceiling. It is used for high-quality lighting of the entire ceiling or its separate part. To implement this method of installation, it is first necessary to install a special perforated film, and the fastener itself is carried out on baguettes, or steel profiles fixed on the floor slab. To install the tape around the perimeter of the canvas, you can use the base in the form of a ceiling or wall baguette. In any case, it is necessary to position the LEDs in such a way that they are at least 3 cm away from the surface of the ceiling finish.
The second installation method is the location of the tape in the niche of the hidden cornice. After installing the cornice, enough free space is formed between it and the wall, in which several LED strips of different colors can be placed at once. You can additionally illuminate the curtains by fixing the LEDs in the cavity between the eaves and the cladding.
The third type of installation is in a floating ceiling. One of the most spectacular ways to illuminate the interior space. It involves the hidden installation of LED strips on the sides of a suspended ceiling canvas, which creates a visual effect of the ceiling hanging in the air.
The fourth way is installation in a special drywall box. The box is usually placed around the perimeter of the stretch ceiling, and sometimes a special rim is mounted along its edges, which creates diffused lighting in the room. Installation in a box allows you to place in a closed cavity not only the LED strips themselves, but also other elements of the lighting system, including controllers and power supplies. Power can be supplied to the box hidden by placing the wire in the corner plinth of the room.
The fifth type of installation is on the body of an aluminum baguette for a two-level stretch ceiling. Ceiling lighting of this type is possible due to the presence of a special place in the aluminum baguettes for the lighting device. This installation allows you to create soft lighting of the first level of the ceiling canvas.
Secrets of professional installation of LEDs on a stretch ceiling
The procedure for creating a light-emitting diode (LED) backlight for a stretch ceiling is absolutely nothing complicated. Any owner of a house or apartment who distinguishes a hammer from a screwdriver can easily cope with such work. But despite this, there are a number of important rules that must be taken into account in order to guarantee high quality and durability of lighting at home. The LED strips on the market are equipped with an adhesive side, which will have to be attached to the stretch ceiling.

But to ensure reliable adhesion to the surface, you must first prepare the installation site. To do this, all dirt, dust and remnants of facing materials must first be removed from the surface to be glued. It is also advisable to degrease the frame or baguette with alcohol. If this is not done, the tape may fall off the ceiling after a few months.
The adhesive side of the tape sticks very well to almost any surface, so you need to attach it to the frame slowly and with all possible care. Before installation, it is not necessary to remove the protective coating from the entire adhesive side, it is enough to release 10-15 centimeters of the tape and remove the rest of the protection as the LEDs are attached to the surface.
The maximum possible length of one tape is 5 meters, so at least 3 or 4 pieces of LEDs are required to create lighting in one room. The connection of the tapes to the power supply must be carried out in parallel. Serial connection is allowed only when using 2 tapes, no more. Many tapes can be cut into several segments, but this can only be done in certain places, which are indicated on the tapes with special indicators.
The power supply for the lighting system must be selected in such a way that its power exceeds the total power consumption from all LED strips connected to it. The preparation of tapes and segments must be carried out in advance, having already risen to the ceiling for installation, this is not only inconvenient, but also dangerous - it is very easy to lose balance.
The ceiling with LED lighting can become the center, the most noticeable and attractive part of the interior, so you should not save on the purchase of such equipment. It is better to immediately invest more money in the improvement of your home and then enjoy the result for several years than to save money and think about repairing or changing the lighting in a couple of months.
Buying a stretch ceiling, you are faced with a difficult choice, because all the prospects of modern finishing technology are revealed to you.
As you can see, the stretch ceiling deserves your attention with its decorative features. However, all the charms of modern decoration require a decent presentation. Next, we will talk about the lighting system.
You can not invent anything new and still use the familiar chandelier or ceiling. In this case, the only thing to be sure to pay attention to is the power of the lamps, since the thin vinyl film can melt if excessive heat is applied. The minimum distance from the incandescent lamp to the canvas can be 30-40 centimeters. When discussing the design of a stretch ceiling, you need to consult with a company specialist and follow his recommendations regarding the type of lamp and the power of the bulbs.
An alternative to chandeliers and ceiling lamps are built-in spotlights. They are external and hidden type. Luminaires with a recessed light bulb are usually used as additional lighting. In the case when the light bulb protrudes somewhat beyond the plane of the canvas, the intensity of illumination increases significantly. The use of glossy vinyl film creates spectacular reflections.
Increasingly, LED strip under a stretch ceiling is used as a backlight. This is a plastic strip with LEDs. There can be up to 240 pieces per linear meter of tape. The voltage of 12 volts is supplied through a step-down transformer. Light control can be either the simplest, in two modes (On and Off), or an adjustable potentiometer or remote control.
LED strip is used in various designs of stretch ceilings.
- Illumination in a two-level design
The stretch ceiling consists of two parts: a plasterboard box around the perimeter of the room and a stretch fabric in the center. Installation of the LED strip under the stretch ceiling is carried out in the niche of the box. Keep in mind that an additional level will require at least 15 centimeters, which may not be acceptable in a small apartment.
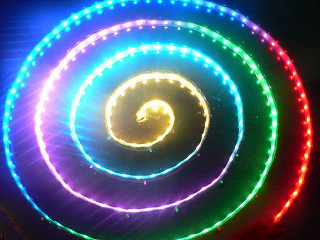
- Translucent stretch ceiling
![]()
Above, we examined the illumination of the room around the perimeter. based on the use of a vinyl film that transmits about half luminous flux. In the daytime, he pays no attention to himself. The LED strip is installed under a stretch ceiling, and other sources are used as the main lighting - a chandelier or spotlights. When turned on, original lighting and color effects appear on the ceiling, depending on whether a multi-color or monochrome tape is used in the system.
The question of how to install a tape under a stretch ceiling is not an idle one. You can easily find videos and other educational materials for do-it-yourselfers on the Internet. At first glance, everything seems quite affordable, but still try to follow simple rules:
- when connecting, be sure to observe the polarity;
- knowing the power of the LED strip for a stretch ceiling, select a power source for it that is 25 percent more powerful;
- when working with the tape, be careful, because it is quite fragile and can fail due to excessive mechanical stress;
- at the points of contact between the adhesive base and the ceiling there should be no bumps, protrusions.
From improper installation, the stretch ceiling LED strip may glow unevenly. In order to avoid this and other troubles, it is best to trust a professional who will not only mount it correctly, but also help you buy the tape you need in length and brand without error.