
To be honest, this article is for a general educational program, but it can come in handy as a methodically competent guide.
Turned on? Does not work. It is clear that the problem is the passage of electrons through the light bulb. That is, they do not run.
In principle, the electrical circuit is not so complicated. The wires go from the fuse boxes (in the box), then into the room through the hidden box. Further through the switch on the wall and only then to the chandelier. Chandelier failure is usually divided into light bulbs and connections. Not so many details that make up the chandelier.
You can add that everything is possible and not worth your efforts, and the chandelier itself may be outdated (in terms of design) and you have long ceased to like it and have long been waiting for it to break, to replace it!
The main detail that requires special attention is the electric cartridge into which the light bulb is inserted.
And if a light bulb or several light bulbs does not light in the chandelier, then there may be several reasons:
the light bulb burned out;
the light bulb is initially faulty, although the filament is intact;
there is no reliable electrical contact between the light bulb and the contacts in the cartridge;
there is no reliable electrical connection (contact) between the wire and the contact of the cartridge;
there is no reliable electrical connection between the branching wires in the chandelier;
there is no proper contact at the point of connection of the chandelier to the electrical network of the apartment;
the wire from the point of connection to the network to the electric cartridge burned out.
All this is considered provided that there is voltage in the network of the apartment and it is supplied to the chandelier, i.e. the switch is working, and the voltage in the network corresponds to the nominal one.
And so let's look at how to eliminate all these reasons when the light is off in the chandelier:
If you believe that the light bulb in the chandelier has burned out, then you need to replace the light bulb with a known good one.
If you think that there is no reliable electrical connection between the bulb and the contacts in the cartridge, then in this case bending the contacts in the cartridge will help, that is, with the bulb turned out and the voltage turned off (by an automatic switch in the electrical panel and a switch on this bulb), you need a screwdriver or tip knife, bend the contacts of the cartridge, to which the light bulb is pressed when screwing in, so that these contacts are pressed against the light bulb earlier. And when the light bulb is fully screwed in, the contact should be more reliable.
If there is no contact of the wire with the cartridge at the place of its connection, then it is necessary to take a screwdriver and screw the wire more securely (if the wire is burnt, it is necessary to clean it in the place where it is attached to the cartridge).
If you have determined that there is no reliable electrical connection between the branching wires in the chandelier, then you need to either solder this connection or connect it through the terminal block.
When there is no proper contact at the point of connection of the chandelier to the electrical network of the apartment, simply make this connection through the terminal block or PPE.
If you find that a wire has burned out in the chandelier (as a result of a short circuit in the cartridge), then there is nothing left but to replace all the wires that have lost their insulation reliability. Choose wires with a cross section of at least those that were installed during assembly by the manufacturer, and the crib allows the design of the chandelier, you can use wires with a larger cross section. Wires must be taken necessarily copper with double insulation.
There are situations when the cartridge in the chandelier has burned out or broken and cannot be restored. In this case, you need to find a similar cartridge and replace the faulty one, while trying to remember the disassembly sequence so that you do not have problems when assembling the chandelier.
The chandelier does not burn, self-repair.
You enter the room, turn on the switch, but the chandelier does not light up, although the lamps are intact and in place. Before buying a new chandelier, you need to check everything, perhaps the switch does not work or the contact is oxidized somewhere.
When troubleshooting, you should remember: in the days of the USSR, the wiring was often done so that the switch interrupted the neutral wire, according to modern requirements, the switch must necessarily break the phase wire. Therefore, today in the apartments there are both options, which can cause additional difficulties.
For example, let's take a chandelier with two groups of lamps, each of which is turned on by its own switch button (Fig. 1).
If all the lamps do not work, therefore, the fault should be sought in the common part of the circuit for both groups of lamps. And this is the section from the box to the switch (section 1-2), from the box to the lamps (section 6-8) and the switch itself.
It's best to start with the switch because it's the easiest to get to. To do this, you need to remove the keys and the decorative frame, which is easily done using. We have three terminals (points 2,3 and 4), one of which is located opposite the other two and is a supply (Fig. 2).
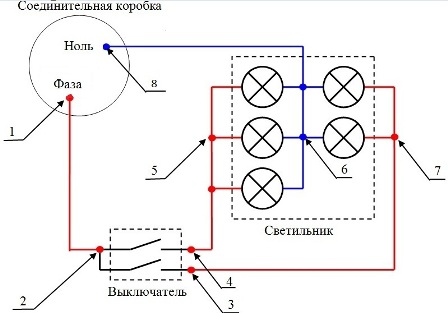
Figure 1 - Schematic diagram of the connection of the switch and the chandelier with interruption of the phase wire
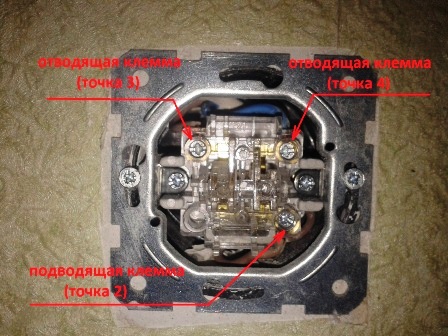
Figure 2 - Switch terminals
Having turned off the switch, use an indicator screwdriver to check the phase at the supply terminal (point 2). Its presence means that we have a circuit with an interruption of the phase wire shown in Fig. 1 and the wire from the box to the switch is intact (section 1-2).
Turning on the switch, check the phase at the outgoing terminals (points 3 and 4), its presence means that the switch is working.
Having removed the base of the chandelier, we will find under it three twists or a terminal block for three terminals (Fig. 3).
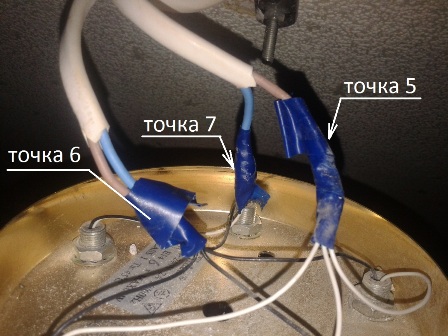
Figure 3 - Groups of chandelier lamps
Turning on both keys of the switch, check the voltage between points 5.7 and 6. If there is voltage, replace the chandelier. Otherwise, touch each of the contacts with an indicator screwdriver, if all of them have a phase, then the neutral wire from the box to the chandelier (6-8) is faulty. Sometimes it breaks at the exit from the ceiling, less often the contact in the box or the contact on the chandelier is oxidized. If there is no phase on all three terminals, then the wires from the switch to the lamp groups (section 3-7 and section 4-5) are faulty, which is rare.
Now consider the case if there is no phase on the supply terminal (point 2) of the switch, in its off state. But at the same time, there are phases on the outgoing terminals (points 3 and 4), which means that we have the circuit shown in Fig. four.
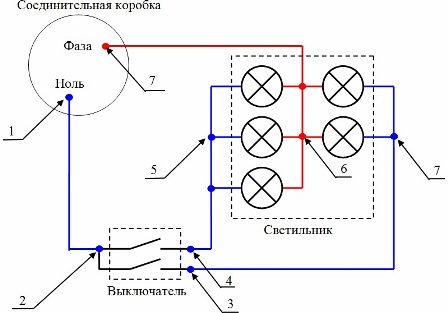
Figure 4 - Schematic diagram of the connection of a switch and a chandelier with an interruption of the neutral wire
It is necessary to remove and ring the switch, if it is working, then the neutral wire from the box to the switch is damaged (section 1-2). First of all, you need to look at the exit from the wall to the socket and in the junction box.
If there is no phase on all three terminals (points 2,3,4) when the switch is off, then the phase wire is damaged, regardless of the connection scheme. We recommend reading:
To figure it out to the end, you can turn on the switch, take the working phase from the outlet and measure the voltage between it and the chandelier terminals (points 5,6,7). If voltage appears in one of the three cases, the phase wire from the box to the switch is damaged. If voltage appeared in two out of three cases, the phase wire from the box to the chandelier is damaged.
It should be noted that during installation, the wires are not laid from the switch directly to the chandelier (sections 4-5 and 3-7), but pass through the junction box.
If a wire malfunction is found in any area, it is worth looking at the places where it exits the walls, that is where it most often breaks.
13OctChandelier not working? Finding a reason
If you did not get the desired result when you tried to turn on the light in the room, then you can start looking for the causes of the malfunction immediately in the switch, the power supply and in the lighting device itself. A good example is perhaps the most common chandelier, made up of two groups of lamps that are switched on separately.
Circuit Breaker Diagnostics
If all the lamps do not turn on at once, it is better to start troubleshooting with the switch, because. the easiest way to get to him. Using an indicator screwdriver, you need to remove the decorative frame and keys, and then measure the voltage at three points.
The presence of voltage at the supply terminal means that the wire leading from the box to the switch is working. The voltage on the two outgoing terminals indicates the operability of the switch.
Mains diagnostics
If the switch is working, the search for a solution to the problem due to which the chandelier does not work should be carried out in the mains. If there is voltage on the terminal block under the base of the chandelier at three points, then the problem is a malfunction of the chandelier. Otherwise, if there is a phase on each of the contacts, then the fault is in the neutral wire from the chandelier to the box. If there is no voltage at any terminal, then the problem is in the wires going to the groups of lamps from the switch.
Sometimes there is an option when there is no voltage at the supply terminal of the switch in the off state, but it is present at the outgoing terminals. In this case, the switch must be removed and ringed. If it turns out to be working, then the fault is in the neutral wire leading from the box to the switch. Then it is necessary to inspect the socket at the exit from the wall and the junction box.
If in the off position of the switch there is no voltage on three terminals at once, then the cause of the malfunction must be sought in the phase wire, and the connection diagram is not of particular importance.
To get a specific answer why the chandelier does not work, you need to turn on the switch, and then measure the voltage between the working phase from the outlet and the chandelier terminals. If voltage appeared in one case, then the phase wire going from the box to the switch is faulty. In the event that voltage appeared in two cases, the phase wire going from the box to the chandelier is faulty.
Have you been in this situation: The lamp in the chandelier does not light Do you think the light bulb burned out? You change the light bulb, but it does not light up, and oddly enough, the light bulb that you unscrewed turned out to be intact. You twisted it into another chandelier and it burns there. Then why don't the old bulb and the new one want to burn in this chandelier? Let's figure it out, it's a domestic matter, and everyone needs light.
Light bulb not on
In fact, it's not the light bulb, as you initially thought. Then what is the reason? And is it repairable?
Possible causes if the light is not on
- Cartridge burnt out.
- Chandelier wire burnt out.
- The switch burned out.
We begin to look for the cause, in order.
chandelier holder
We check the cartridge. In the cartridge, the tongue usually burns out, which is in contact with the base of the light bulb. Often it does not burn out at all, but only either:
- It is pressed hard and there is no contact with the light bulb.
- It gets dirty and there is also no contact with the bulb base.
Repair: if pursed, then bend or bend ( watch the video below), if it gets dirty, then we clean it, cleaning can be done according to the principle of repairing the remote control.
Chandelier wiring
If the wiring burned out, then you need to find this place.
Repair: I usually remove the chandelier, pull out the old wires from it and insert new ones, preferably with a section thicker than before. If there are obvious wire breaks from the contacts of the cartridge, then this is the reason, we just screw them into place.
Switch replacement or repair
It remains to be seen if the switch burned out? How to find out?💡 It's simple, if the above is whole and there are no damage defects, then
Repair: You can buy a new switch, replace it and have no problems, but sometimes the switch has the same trouble as with the cartridge tab. If the contact points of the switch are black or smoked, then they must be cleaned, just as I described above about the cartridge.
I’ll tell you in secret that it’s not difficult for me to replace the switch and it’s not difficult to clean its contacts, but knowing the weak level of experience of ordinary people ( especially on the electrical side), then it will be easier for such people to replace the switch than to clean its contacts. But I always start from this theory:
- If the switch does not work, I will always have time to replace it with a new one, so why not try to do it first? If it works out, then Super, well done 😎! If not, then it’s okay, it still didn’t work, and now you can replace the switch with peace of mind.
And remember that if light bulb is not on, it does not always happen that she burned out, but it does not always happen that it is time replace the switch!