Instruction
Most common cause the extinction of the light bulb is the failure of itself. The most affordable way to check this at home is to rearrange the lamp in another lamp with a similar base. In this case, a number of precautions must be observed: de-energize both lamps before removing and installing the lamps, allow the lamp to cool if it has recently gone out, and also do not put a light bulb of more power than the one for which it is designed. An incandescent bulb can also be checked with an ohmmeter (necessarily having previously turned it out), and if it is transparent, by visual inspection (in this case it is not necessary to turn it out). The halogen light bulb must not be touched directly with your hands - only through a dry, lint-free cloth and only when completely cool.
If the light bulb turned out to be the "guilty" one, the troubleshooting ends there. Change it and your lamp will work again. And if the matter turned out to be not in her and she earned it in another lamp, and in the one that stopped working, other, obviously serviceable bulbs do not burn, you will have to continue the search. A cartridge, a switch, a plug, wires may turn out to be faulty, and if the lamp is plugged into a socket, then the socket. In this case, it must be checked first. Turn on the lamp in another outlet, and in the one in which it was turned on before, turn on another device - at least a charger with a mobile phone connected to it. This is how you find out if the problem is in the outlet. If not, check the plug, which must be pulled out of the socket beforehand. The ohmmeter should show the presence of conductivity between the pin and the opposite end of the wire connected to this pin (but in no case both wires coming from the plug, this indicates a dangerous short circuit). A faulty non-separable plug will have to be replaced with a collapsible one, and if the existing plug is already collapsible, you can open it, check and fix the contacts.
If the cause of the malfunction was not in the socket or plug, or the lamp is not connected at all through the socket, you need to check the switch. De-energize the lamp by removing the plug from the socket or, if there is none, by turning off the machine in the shield. In the second case, make sure that the entire line (for example, the ceiling line, if we are talking about a chandelier) is de-energized, that is, the rest of the lamps powered by it have stopped working. Get to the switch terminals, check with an indicator screwdriver that there is no voltage on them, and connect an ohmmeter to them. In one of the positions of the switch, it should show the presence of conductivity. If not, the switch contacts must be cleaned or replaced entirely. Some switches are attached by soldering, in which case appropriate skills will be required.
If the switch is working, check the cartridge. This should also be done with a de-energized lamp. In the same way as in the case of a plug, check with an ohmmeter for continuity between the cartridge terminal and the opposite end of the wire leading to this terminal. Cartridges, unlike forks, are almost always collapsible. By opening it, you can see if the wires are well connected to the screws, and if not, fix it. The terminals relating to the base and the central contact of the light bulb can be cleaned, the pressing central terminal can be slightly bent. Miniature ceramic cartridges for halogen lamps can only be changed in its entirety. The chandelier may also have a terminal block located in the cap to be faulty or poorly connected. Sometimes there you can find twists in electrical tape instead of it - then the terminal block will have to be installed.
In a lamp with a halogen lamp, if it is low-voltage, the step-down transformer may be faulty. If all the wires leading from it to the switch, plug, cartridge, etc., are intact, the rest of the lamp parts are in good order, and all the bulbs in it are not lit, this particular component should be changed.
13OctChandelier not working? Finding a reason
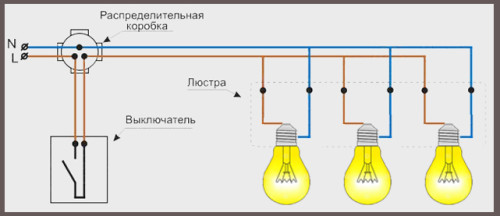
If you did not get the desired result when you tried to turn on the light in the room, then you can start looking for the causes of the malfunction immediately in the switch, the power supply and in the lighting device itself. A good example is perhaps the most common chandelier, made up of two groups of lamps that are switched on separately.
Circuit Breaker Diagnostics
If all the lamps do not turn on at once, it is better to start troubleshooting with the switch, because. the easiest way to get to him. Using an indicator screwdriver, you need to remove the decorative frame and keys, and then measure the voltage at three points.
The presence of voltage at the supply terminal means that the wire leading from the box to the switch is working. The voltage on the two outgoing terminals indicates the operability of the switch.
Mains diagnostics
If the switch is working, the search for a solution to the problem due to which the chandelier does not work should be carried out in the mains. If there is voltage on the terminal block under the base of the chandelier at three points, then the problem is a malfunction of the chandelier. Otherwise, if there is a phase on each of the contacts, then the fault is in the neutral wire from the chandelier to the box. If there is no voltage at any terminal, then the problem is in the wires going to the groups of lamps from the switch.
Sometimes there is an option when there is no voltage at the supply terminal of the switch in the off state, but it is present at the outgoing terminals. In this case, the switch must be removed and ringed. If it turns out to be working, then the fault is in the neutral wire leading from the box to the switch. Then it is necessary to inspect the socket at the exit from the wall and the junction box.
If in the off position of the switch there is no voltage on three terminals at once, then the cause of the malfunction must be sought in the phase wire, and the connection diagram is not of particular importance.
To get a specific answer why the chandelier does not work, you need to turn on the switch, and then measure the voltage between the working phase from the outlet and the chandelier terminals. If voltage appeared in one case, then the phase wire going from the box to the switch is faulty. In the event that voltage appeared in two cases, the phase wire going from the box to the chandelier is faulty.
The chandelier is the main source of artificial light, so you can’t do without it. Have you started a large-scale renovation or just decided to refresh the interior by replacing the lamp? Here — molight.ru will help you make the right choice.
How to connect the chandelier correctly and what troubles can you expect during its operation? We will answer these questions in today's article. So let's get started.
Various options for connecting a chandelier
Do you want to hook up your new chandelier to a light switch but aren't sure you'll do it right? We will help you deal with different situations.
Wires to be connected
There are only three options here:
PE - protective earth wire (yellow-green).
Modern chandeliers most often have markings. But they began to apply it quite recently, so specimens without letter designations often come across. In their absence, it is best to check the wires with an indicator screwdriver. It will allow you to accurately determine the type of cable.
Grounding is not always found and does not perform any function other than protective, there will be no problems with it. This wire must be connected to a similar one in the ceiling; if there is no such wire in the device, it is simply isolated.
What do you need to arm yourself with before work?
Voltage indicator (special indicator screwdriver).
Pliers.
Multimeter.
Insulating tape.
Terminal block.
It will also be nice to stock up on a marker, a passport for a chandelier and a stable stepladder. The first will help you figure out the type of wires, and the second tool will make it possible not to fall during work.
Connection options depend on the number of wires in the chandelier and ceiling. Each case will require a different approach.
Attention! Be sure to turn off the electricity in the switchboard before starting work. Otherwise, you may be electrocuted.
Case one: 2 wires and 2 (chandelier and ceiling)
This is the easiest way to connect. There is no need to think too much here. Find out in advance where the phase is and where it is zero, and connect the wires to each other. At the same time, remember that the phase is led to the chandelier and the one-button switch, zero - directly to the junction box.
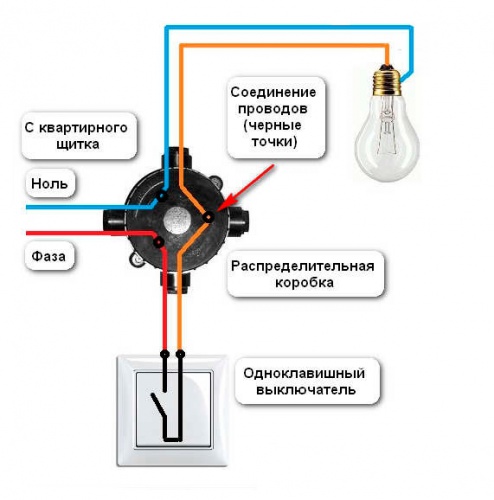
If it is difficult to immediately determine the phase and zero, an indicator screwdriver will help you. Before that, you have to turn on the electricity. And as soon as you figure out the cables, turn it back off.
The wire to which the indicator reacts with a lighted bulb is the phase, if there is no reaction, it is zero. For convenience, you can make the notation with a marker. This is especially helpful when there are three or four or more wires.
Case two: 2 and 3
First of all, you need to determine which wire is which. One of the three cords on the ceiling will be zero, two phase. This alignment suggests that the electricians intended to connect the chandelier to a switch consisting of two keys. However, if there are only two wires in the lamp, a single-key one will suffice.
We act according to logic. We connect the phase to the two phase wires on the ceiling, and the zero cord to the zero wire.
Case three: 3 and 2
In such a situation, the chandelier will be connected to a single-gang switch. Twist the neutral wires in the ceiling light and connect them to the neutral cord in the ceiling. The same must be done with the phase wires.
There is nothing complicated here and there is no need to be afraid of the difference in the number of cords.
Case four: 3 and 3
This is the most interesting option, but if you gradually understand the sequence of actions, it turns out that everything is not so difficult.
Here you can distribute the load on the lamps and connect the chandelier to a two-gang switch.
The following wire markings are used as standard: L1 (orange phase cable), L2 (phase cable yellow color), N (blue zero cable). However, not all manufacturers use such color and letter designations, so it's best to check the cables yourself.
All light bulb wires must be divided into two groups. Each of them is individually connected to only one wire, first with the one to which the phase is suitable, and then with zero.
In this way, you will ensure that when you press the first key of the switch, one group of light bulbs will light up, and when you press the second, another. Most often, this method is used for chandeliers with five shades. One key turns on two lamps, and the second - three.
Case five: 3 and 4
In this case, the fourth wire on the ceiling is protection, grounding. This option is most often found in new buildings or private homes. Dealing with him will not be difficult. If your fixture has a green/yellow ground cable, simply connect the wires. In the case when there is no such cable in the chandelier, insulate the protective cord from the ceiling. Otherwise, the connection of phase and zero is identical to the previous scheme.
Why is the chandelier not on?
We do not connect a new chandelier so often, but we use it all the time. Problems in her work are often encountered and require urgent solutions, because without ceiling lamp hard to get by.
So, how to understand why the chandelier does not work?
Let's start by checking the bulbs. In conventional incandescent lamps, their serviceability is checked by the integrity of the tungsten filament. Broken off means burned out. But sometimes even with a whole spiral, the light bulb is faulty. Then you need to pick up a multimeter. Attach one feeler gauge to the base threads. If the arrow moves, the bulb is intact; if not, the bulb is damaged. In the first case, you will have to proceed with a more thorough repair of the lighting fixture, in the second, you will have to replace the light bulb. By the way, in LED chandeliers, lamps can only be checked with a multimeter.
The next step in troubleshooting is the switches. It happens that the contacts simply burn out, and as a result, the current does not reach the cartridges. You need to flip the switch. If you notice something wrong, strip the wires to the color of the metal.
If everything is in order with the contacts, go ahead and carefully inspect the wiring on the ceiling. The current may not reach the chandelier itself. Remove the lamp and use an indicator screwdriver to see if there is voltage in the wires. A break could occur. If you find that the cables are out of order, there are two options: replace the old wiring, or extend the damaged wire to connect to the chandelier. The first is better, because in this way you will protect yourself from such troubles in the future.
When everything is in order with the wiring, then only the chandelier remains. A simple lamp needs to be disassembled, to check the condition of the wire connection and insulation. Probably burned out one of the cables due to a short circuit. Be careful and you will definitely find the problem.
As a result of such a rigorous analysis, the chandelier will start working, no doubt.
Connecting and repairing the lamp is not so difficult, the main thing is to slowly figure out what's what, and then everything will go like clockwork.
Feature articles
Chandeliers with a remote control appeared on sale a few years ago and immediately gained popularity among consumers. Such a device ceiling chandelier quite complex and breakdowns occur frequently. Buying new equipment will be expensive, so you can try to repair the chandelier with your own hands. What to do if the chandelier does not turn on with the remote control?
Remote control chandelier design
It consists of three groups of electronics: an LED lamp block, a halogen block, now with the release of a large number of LED lamps, now we can say LED too)) a lamp and a relay in the form of a control panel with buttons and a signal receiver, which is always sold together and tuned to its own frequency . The LED chandelier contains many multi-colored diode lamps designed to switch backlight modes. Electricity comes from a capacitor that is part of the LED circuit. The halogen unit is powered by transformers that pulse the supply voltage. The controller and control unit of the radio signal of the relay consists of electromagnetic relays that switch the current of a certain power. The remote control has from 2 to 4 buttons, control is carried out via infrared, more often via radio.
Possible causes of malfunction
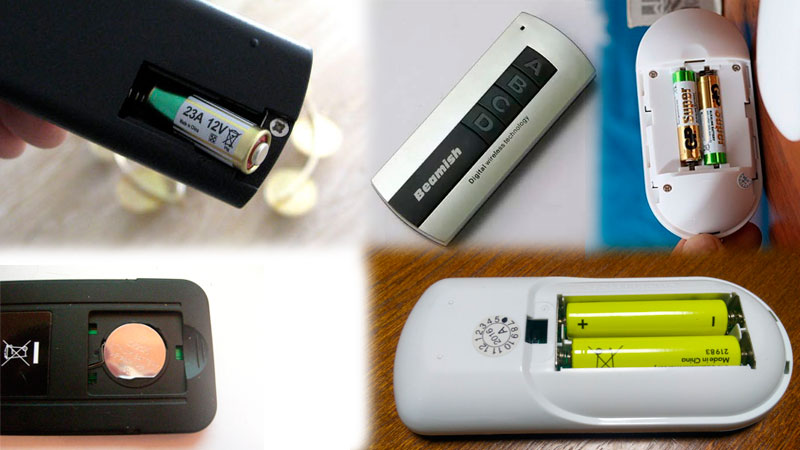
The electronic circuit of the remote control is simple and reliable. When the chandelier turns on properly, if you use the switch, but does not turn on with the remote control, it is recommended to replace the batteries first.
The chandelier does not respond to the remote control:
Check the batteries, replace them if necessary;
Test the buttons by pressing each button alternately. If one or more of them do not work, it is necessary to clean the contacts from dirt and dust: apply a drop of glue, crushed graphite on the glue;
If the buttons and batteries are in working order, the cause of the breakdown lies in the signal receiver - you will have to replace it along with the remote control. The sequence of work: de-energize the apartment, remove the chandelier, open its box, replace the power supply, hang the chandelier.
If there is no urgent need for remote control of the luminaire, you can use the luminaire directly with a switch. One press will change the number of lamps turned on alternately, until it turns off completely. Or put on a two-gang switch and will switch the modes of the LED backlight, the second one will change the modes of the number of lamps turned on.
Some of the lamps have stopped burning:
- non-working lamps halogen lamp should simply be replaced;If the LED backlight does not work, you need to replace all the diodes at once, or find a non-working lamp and replace it with exactly the same one, but this is often difficult to do due to the fact that the chandeliers are quickly updated and the same LEDs that were previously found will be problematic;
If the halogen and LED elements are working properly, the matter is in the transformer supplying the light bulbs. It is necessary to purchase a similar model and make a replacement.

Chandelier not working at all
If the chandelier with the remote control does not turn on at all, you should use a multimeter to check the voltage, then the lamps, fuses, the integrity of the wires. If everything is in order, then the chandelier controller is out of order and you need to change it. Control controllers are sold together with a control box that is hidden inside the chandelier. If you are not at all electrically savvy, it is best to call a professional electrician for a replacement. In terms of time, replacing the controller takes a maximum of 15-30 minutes.

To be honest, this article is for a general educational program, but it can come in handy as a methodically competent guide.
Turned on? Does not work. It is clear that the problem is the passage of electrons through the light bulb. That is, they do not run.
In principle, the electrical circuit is not so complicated. The wires go from the fuse boxes (in the box), then into the room through the hidden box. Further through the switch on the wall and only then to the chandelier. Chandelier failure is usually divided into light bulbs and connections. Not so many details that make up the chandelier.
You can add that everything is possible and not worth your efforts, and the chandelier itself may be outdated (in terms of design) and you have long ceased to like it and have long been waiting for it to break, to replace it!
The main detail that requires special attention is the electric cartridge into which the light bulb is inserted.
And if a light bulb or several light bulbs does not light in the chandelier, then there may be several reasons:
the light bulb burned out;
the light bulb is initially faulty, although the filament is intact;
there is no reliable electrical contact between the light bulb and the contacts in the cartridge;
there is no reliable electrical connection (contact) between the wire and the contact of the cartridge;
there is no reliable electrical connection between the branching wires in the chandelier;
there is no proper contact at the point of connection of the chandelier to the electrical network of the apartment;
the wire from the point of connection to the network to the electric cartridge burned out.
All this is considered provided that there is voltage in the network of the apartment and it is supplied to the chandelier, i.e. the switch is working, and the voltage in the network corresponds to the nominal one.
And so let's look at how to eliminate all these reasons when the light is off in the chandelier:
If you believe that the light bulb in the chandelier has burned out, then you need to replace the light bulb with a known good one.
If you think that there is no reliable electrical connection between the bulb and the contacts in the cartridge, then in this case bending the contacts in the cartridge will help, that is, with the bulb turned out and the voltage turned off (by an automatic switch in the electrical panel and a switch on this bulb), you need a screwdriver or tip knife, bend the contacts of the cartridge, to which the light bulb is pressed when screwing in, so that these contacts are pressed against the light bulb earlier. And when the light bulb is fully screwed in, the contact should be more reliable.
If there is no contact of the wire with the cartridge at the place of its connection, then it is necessary to take a screwdriver and screw the wire more securely (if the wire is burnt, it is necessary to clean it in the place where it is attached to the cartridge).
If you have determined that there is no reliable electrical connection between the branching wires in the chandelier, then you need to either solder this connection or connect it through the terminal block.
When there is no proper contact at the point of connection of the chandelier to the electrical network of the apartment, simply make this connection through the terminal block or PPE.
If you find that a wire has burned out in the chandelier (as a result of a short circuit in the cartridge), then there is nothing left but to replace all the wires that have lost their insulation reliability. Choose wires with a cross section of at least those that were installed during assembly by the manufacturer, and the crib allows the design of the chandelier, you can use wires with a larger cross section. Wires must be taken necessarily copper with double insulation.
There are situations when the cartridge in the chandelier has burned out or broken and cannot be restored. In this case, you need to find a similar cartridge and replace the faulty one, while trying to remember the disassembly sequence so that you do not have problems when assembling the chandelier.
The chandelier does not burn, self-repair.