You can simulate the flame inside different ways: twine a few logs with a garland of flickering lamps, insert candles into the holes on the logs, do without firewood and simply place a few large candles in the portal, or cover the portal with reflective foil and build in flashing lamps. The portal can be closed with a forged one if desired.

No. 11. Drywall cornice
Easy enough to do by hand remote and even install a backlight in it so that the window looks unique at any time of the day. Such a structure is attached to the ceiling, it can be created even at the stage of ceiling design, if drywall is chosen for this. The cornice frame can be attached to the finished ceiling with special butterfly mounts. Further, the process comes down to sheathing the frame with drywall and further decoration.

No. 12. Drywall column
A column can decorate a room of virtually any size, help zone a space, or even hide utilities. Have a column next to a wall or in a corner, the frame is attached to the floor and ceiling. To give the drywall the desired shape, it is rolled with a spiked roller, slightly moistened with water and, according to a pre-prepared template, give it the desired shape. Installation begins only when the material is completely dry. There is also a dry way to shape drywall: cut from the back into small segmental strips.

When all the drywall is installed, the finishing stage begins: puttying, grinding, painting can also be built from drywall. Compared to chipboard, plastic and wood, drywall provides more opportunities in terms of implementing bold design ideas. Such a bar counter can be placed anywhere, make it any desired shape and decorate as you like.
It all starts with the installation of the frame, and the corners are recommended to be made from a single profile so that the structure receives maximum rigidity. Guides and transverse profiles are fixed with crabs. When the stability of the frame is beyond doubt, they proceed to the installation of drywall sheets of the required size. The walls of the rack can be either completely smooth or contain niches, then the frame must be built taking them into account. After puttying the joints and places for installing self-tapping screws, as well as grinding, the structure is painted in the desired color, a plinth and backlight are installed, if any.

No. 14. Chest of drawers, cabinet and kitchen set
Experienced craftsmen create unique furniture from drywall, which is not inferior in functionality to analogues from more familiar materials, but at the same time can be created quickly and taking into account all personal requirements.
Many want to make beautiful plasterboard ceilings, but not everyone can imagine which ones. This material is often used in ceiling decoration.
But it may not always fit. And if you decide to install, then the question arises of how to make a beautiful plasterboard ceiling, there are several options for making this product.
In this article, we will figure out which rooms this material is most suitable for and what types can be made. You will have the opportunity to view photos and videos on this topic and choose exactly what you need.
Advantages and disadvantages
This material has its advantages, but you can also find disadvantages. You should know this before making your choice.
Advantages
The advantages are also indicated by the fact that this material is often chosen for some options for finishing the ceiling (see).
And there are reasons for this:
- It is an environmentally friendly product that is not harmful to human health;
- The entire department can be done with your own hands and without resorting to outside help. This will greatly reduce the overall costs and this is important;
- With this material, you can make almost any shape. There is a detailed article on this on our website.
And it's not that difficult. You don't need a special tool to work, you can get by with the one that almost any owner has.; - During installation, it is possible to provide for the fastening of the insulation. And any thickness.
This should only be provided for initial stage installations; - It is possible to use almost any lamps;
- The simplicity of care can also be attributed to the advantages. Even if you mechanically damage the material, you can always correct the defect.
Moreover, it will not take much time and will not require a large amount of money; - The price of the material is not high. Below many analogues. This product can be afforded by a person with any income;
- You can always decorate and apply any stucco;
- It tolerates temperature fluctuations well and can be fixed in rooms with non-permanent heating:
- For installation, you do not need to align the base plane. Moreover, you can not only not align, but also hide unnecessary communications.
Flaws
This design also has its drawbacks, which must be considered:
- Installation requires space, so it will take up the usable area of \u200b\u200bthe room (it is not recommended to do it in rooms with);
- When flooded, it will not save. And moreover, this material is gaining moisture and therefore it is necessary to change the entire structure;
- This design is not collapsible. Therefore, there may be difficulties in repairing the wiring.
Attention: If you are installing a plasterboard ceiling. Be sure to install the wiring correctly.
Make access to the junction box and step down transformer. This may always be needed.
- This finish is not suitable for cladding large rooms, such as a concert hall.
Installation options
This material can be installed in several forms. You should select before starting the installation, because it is not performed in the same way.
Yes, the materials are different. In general, there are not a limited number of species in the design, exactly as many as your imagination is enough for.
But you can highlight the main, so to speak basic:
- Single-level systems;
- Two- or three-level systems;
- Complex structures.
Let's look at what these types of finishes are.
single level
This is the most simple design which will make the plane and quite even:
- This is the least thin option, which will hide errors and at the same time will not take up a large amount of usable area;
- It is quite possible to do such a finish yourself. It serves as a base for mounting multi-level systems;
- A frame is installed at the base (see), which can be made of a metal profile or a wooden beam;
Attention: If you chose the second option, then do not forget that all items should be treated with antiseptics that are available in retail. This will protect the elements from the formation of mold and rot.
Extend the life of the entire structure. Do this in advance, the material should be processed a couple of times, and it should be remembered that it needs to dry.
Learn it.
- After installing the frame, the elements are simply sheathed with drywall.
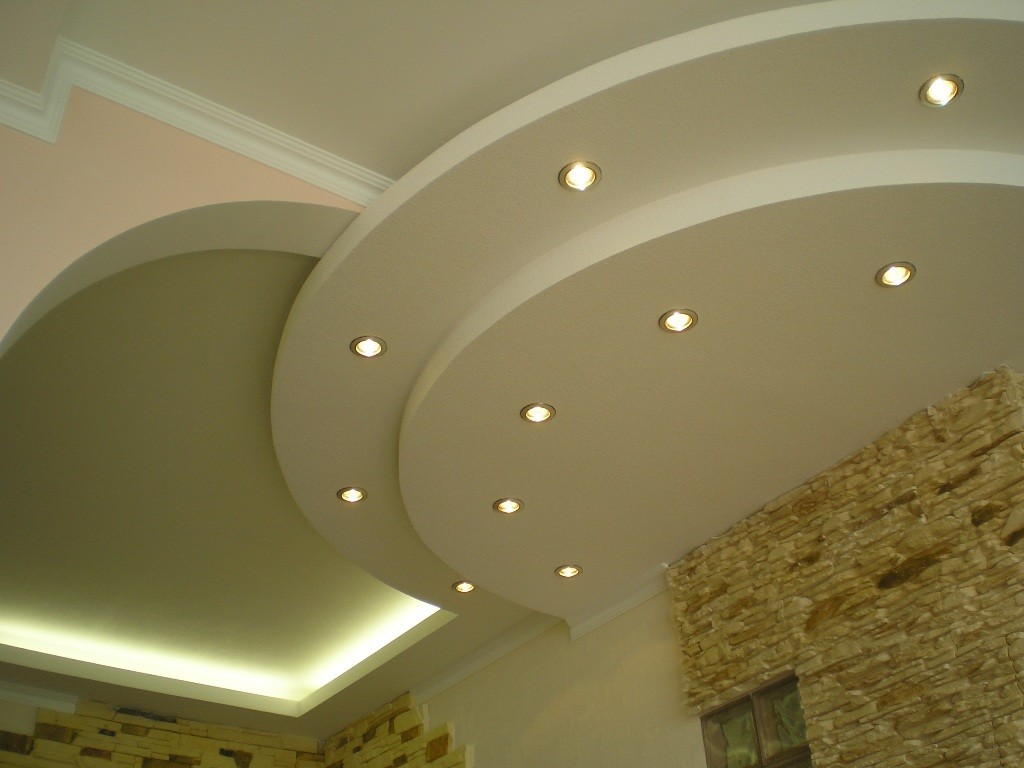
Two- or three-level structures
This version has both simple and complex designs.
They are characterized by the following features:
- For the first level, you can apply both the base ceiling and the single-level one. It all depends on the original finish;
- Each level that is applied next will have a smaller area;
Attention: In such a system, you should initially decide what exactly you want to hide. And at what height. The design itself and its appearance will depend on this.
- For all levels in this design, the previous level serves as the basis for fastening. Only for the first fastening is carried out on the base ceiling.
Types of multi-level ceiling
For such a system, there are several types that are worth considering:

- Beautiful frame ceilings made of plasterboard can be made from one- and two-stage boxes. As a rule, such elements are not made in the correct form and various figures are used (see);
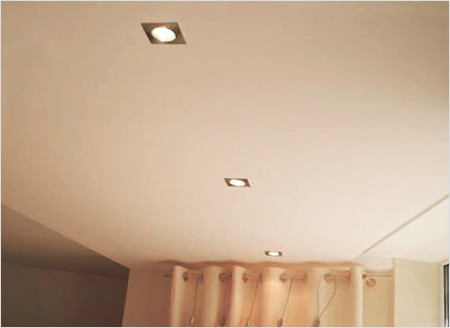
- In most cases, lighting is used Spotlights, which can be equipped with energy-saving lamps;
- They also make a beautiful diagonal plasterboard ceiling. For such a finish, the second and third levels often divide the room in half with a pattern.
Basically choose the location from two opposite angles. In this case, the area of finishing may be different. - Zone finishes have become very fashionable now. This is when you want to highlight any area in the room.
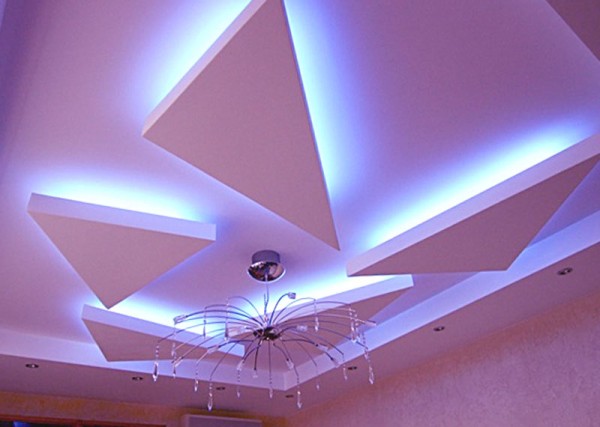
Complex ceilings
The most difficult to perform are complex ceilings, here you have to work hard. In fact, it's just a multi-level system.
Only it has a more complex and difficult structure. Here it is necessary to think carefully design decision and then bring it all to life.
There can be quite a large number of solutions and many forms.
We present the most common:
- The ceilings are curly, which are based on various figures that are placed in the center of the ceiling. They are done mainly at the second and third levels.
Attention: When performing such a design, attention should be paid to the bending of drywall. If it is not performed correctly, then later the plane may crack or have an irregular shape.
Instructions for performing this work are on the pages of our website.
- Abstraction is a finish that does not have a specific configuration and is done in different parts of the room.
Attention: If you have chosen just such a finish, then you should think over the backlight correctly. It is she who will determine the appearance of the ceiling.
It is important to correctly distribute the light.
- Cellular ceilings, which are made in the form of separate patterns, which are evenly applied to the plane of the ceiling. They are quite difficult to perform, but the appearance justifies the work spent.
Attention: To perform such a finish, it is extremely important to make the markup correctly. Incorrect application of it will lead to distortion of the plane.
- Soaring ceilings are a fairly new design, which has recently begun to be used. In this version, figures are created that float in the air. They are attached to the ceiling plane with brackets.
Here are the main types of plasterboard ceiling. You have plenty to choose from.
On our website you can find step-by-step instructions for finishing each of the pitchforks.
My home is my castle, and my home is also my pride. That is why you so want everything in it to be beautiful, fashionable, functional. As for the interior, which should please the eye, the design of the ceiling is not the last in this matter.
Beautiful ceiling design- as well as the concept of "attractiveness" in general - this is a subjective moment.
If there is no flight of fancy
Not everyone can come up with an original design idea. Then it would be better to turn to designers and architects, specialists in the installation of ceiling structures. In the catalogs of real professionals you will find many interesting solutions for any premises. And most importantly, experts will help you choose the design of the ceiling for a particular room and its functional features.
You can only focus on your sense of beauty when designing ceilings. But follow the advice on the proper placement of levels and the appropriateness of design delights in this matter. After all, even a simple laconic configuration on the ceiling, well-chosen and well-executed, will look appropriate and beautiful.
Video with beautiful ceilings.
How beautiful to make a drywall ceiling yourself?
drywall ceiling - photo
Working with drywall is not difficult, the material is easy to process, has a low specific gravity and is easy to install. That is why you can mount plasterboard ceilings with your own hands without prior preparation and special knowledge, despite the assurances of professional builders that "you can't do without a specialist."
There are several types of structures: single and multi-level, curvilinear, multi-tiered, with built-in lighting, and so on. Whatever types of plasterboard ceilings you choose, the installation principle will be the same. Therefore, we will consider its main stages and main rules.
Tools and consumables
You will need the same materials and tools as in the case of plasterboard walls. The frame can also be assembled from wooden bars with a section of 40x40 mm, but in any case, the wooden structure will be heavy. This is true if you make a plasterboard ceiling in wooden house. A more modern way of mounting a frame for hinged structures made of gypsum plasterboard is the use of a lightweight metal profile. You will need:
- Standard UD profile, fixed around the perimeter;
- Carrying the main CD profile, inserted into the starting one;
- Longitudinal profile CD, which gives the whole structure rigidity.
Each element, as well as suspensions (if necessary) must be attached to the base of the ceiling in such a way as to ensure that the drywall sheets do not sag under their own weight. That is, a certain distance between them must be maintained. Otherwise, bumps or cracks will form at the joints and joints of the sheets, and decorative ceiling lose straightness.
For the correct and reliable fastening of the frame, it is recommended to use professional fasteners, as well as buy special hangers in the shape of the letter "P". Hangers and frame are attached to the base (ceiling) with 40 mm dowel-nails. The final fastening of the 70 mm profile is carried out with self-tapping screws for metal of the “baby” type with a small drill. The longitudinal profiles are attached to the guides with standard “crabs”, and the GKL sheets to the finished frame are fastened with self-tapping screws for metal 20 mm long (the thickness of the drywall sheet is 12.5 mm).
All these devices and hardware must be purchased in advance, preferably with a margin.
From the tool you will need:
- The building level is at least one meter long. If possible, it is better to use laser levels - new construction devices;
- Measuring devices and tools: tape measure, square, plumb line, ruler;
- Pencil or marker;
- Perforator or powerful impact drill;
- Cordless screwdriver;
- Construction knife for cutting and processing drywall;
- Metal scissors.
Work progress

plasterboard ceiling installation - photo
- A line is marked and outlined along the perimeter of the room, along which the starting UD profile will be fastened. Points are marked in each corner of the room (there are not necessarily four corners), for which a water building level or a laser level is used. This line should be located at a distance of up to 20 cm from the base of the floor (main ceiling). Thanks to this margin, the suspended ceiling makes it possible to install communications and electrical wiring under the finishing materials. Finished marks in the corners are connected in one line.
- Starting profiles are attached along the line to the dowel-nails. The distance between the fasteners should be from 35 to 50 centimeters. The retreat of the first dowel-nail from the edge of the profile on both sides is up to 10 cm.
- Next, the ceiling base is marked for bearing rails and suspensions. As a result of this marking, the ceiling is covered with parallel lines at a distance of approximately 1200-1250 cm (which corresponds to approximately half the width of the drywall sheet). The main guide elements of the frame should be located both along the edges of the GKL sheets and in the middle.
- Hangers are first attached along these marked lines to ensure the necessary lagging of the decorative surface of the ceiling (gypsum board sheets) from the base. The dimensions of the suspensions are determined individually for each room, they must correspond to the distance to the starting profile along the perimeter. Hangers, as already mentioned, are attached to the ceiling (ceiling base) using 40 mm dowel-nails.
- The main guides from the CD profile are inserted into the starting profile located along the perimeter. They should not fit tightly, you should leave a backlash of 1-2 mm. This will be a guarantee that the ceiling will not “lead” during temperature deformation.
- The guides are attached to the suspensions with the help of self-tapping screws - "kids". Be sure to screw in the screws, two on each side. During operation, the horizontalness of the frame is constantly checked using the building level, the deviation is more than one thousandth (1 mm per 1 meter). When fixing, it is also necessary to leave a backlash, this also applies to the joints on the end side, and touching the ends of the hangers to the supporting profiles.
- In order to give the entire frame the necessary rigidity and strength, it is also necessary to fix the longitudinal profiles. The source material (metal profile) is easily cut with scissors for metal the right size, so there is no need to prepare and calculate the dimension of the elements in advance. The distance between adjacent "stiffening ribs" is recommended for longitudinal fastening of GKL sheets - 400 mm, and for transverse - about 600 mm.
- If it is necessary to insulate the ceiling or carry out soundproofing work additional material(for example, mineral wool) fits between the profiles.
Drywall installation

installation of drywall on the ceiling - photo
The direct technology for attaching GKL to the frame is the ultimate guide on how to make a plasterboard ceiling with your own hands. The final, but no less important stage, where you need to adjust the dimensions of the sheets as accurately as possible in order to minimize finishing operations - putty, seam sealing, finishing work, and so on. Several features should be taken into account (in stages):

plasterboard ceiling in a wooden house - photo
- It is advisable to treat all drywall sheets with primer from the “inner side” immediately before installation work, this will provide waterproofing and vapor permeability. After they are fixed on the finished ceiling, priming work is also carried out - this will serve as the basis for finishing - putty, paint, and so on.
- To ensure the penetration of air in free access into the room, you should definitely leave a gap between sheets or even small pieces of plasterboard and walls, 4-5 mm will be enough.
- The main work in the typical version involves fastening drywall to longitudinal profiles in the transverse direction. The first sheets are attached from the walls. Fastening is carried out with prepared self-tapping screws for metal. The step between the attachment points should be no more than 150-200 mm. At the last revolutions of the screwdriver, the efforts are calculated so that the hardware head goes deep into the thickness of the GKL sheet by 2-3 mm. In the future, the caps will be hidden with putty.
- After the final installation, all joints and gaps are puttied, the places where the self-tapping screws are drowned are overwritten. If the joints and mating points are poorly putty, have excessive opening, it is recommended to use a reinforcing adhesive tape.
Covering the ceiling with drywall today is a common type. This is due to its economical cost, excellent technical specifications, beautiful appearance, variability of installation structures. You can make drywall with your own hands. To do this, you need to take into account the advice of professionals who will talk about the step-by-step installation steps. Beautiful ceilings of different levels can be made in any type of room: living room, bedroom, kitchen. can be covered with paint, giving it a certain style.
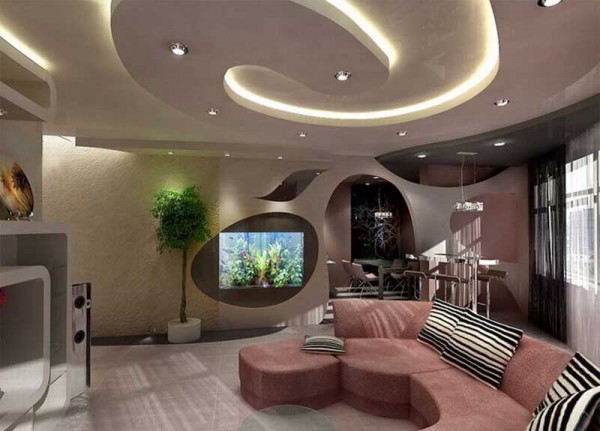
How to make beautiful plasterboard ceilings in the living room
The living room is a gathering point for the whole family and meeting guests. Therefore, it is very important what appearance it has. With the help of a beautifully finished ceiling, a room can be given a style that successfully complements the overall interior. Plasterboard ceiling has a lot of advantages over other types of coatings.
The main advantages of drywall:
- Hides any irregularities and defects on the flow, creating a perfectly flat surface. This ceiling looks neat, simple and stylish.
- Ease of installation of structures of any type, which can be easily done alone or with the help of relatives and friends.
- Profitability. The cost of materials will pleasantly please, and self-installation will save money on the work of professional craftsmen.
- Variation in design. The material is easy to use. With its help, you can realize the most daring ideas.

There is a wide variety of ways in the living room. The material allows you to create designs of different levels, thanks to which the room takes on a stylish look.
Varieties of plasterboard ceilings
- Single level. A simple ceiling, characterized by simplicity, smooth surface and beautiful appearance.
- Two-tier and three-tier. Such ceilings are divided into frame, which is based on the construction of the box, and diagonal - the ceiling is divided into levels, passing from corner to corner. The third type of construction is zonal.
- Complex design (multilevel). Allows you to embody bold and unique design fantasies thanks to the malleability of the material.
Ceilings of different levels can be made in the form of figures, patterns and abstractions.
When choosing a design, an important role is played by the general interior of the room, the area of \u200b\u200bthe room,.
Before repair, it is important to think over the design of the ceiling, take into account all the construction nuances, draw a diagram of the future ceiling.
How beautiful to make a plasterboard ceiling in the bedroom
Plasterboard ceiling is a great solution for. Thanks to the variety of designs, you can create a unique atmosphere of comfort.